Need Help with Salesforce?
We offer all types of Salesforce consulting services such as implementation, integration, customization, administration, AppExchange app development.
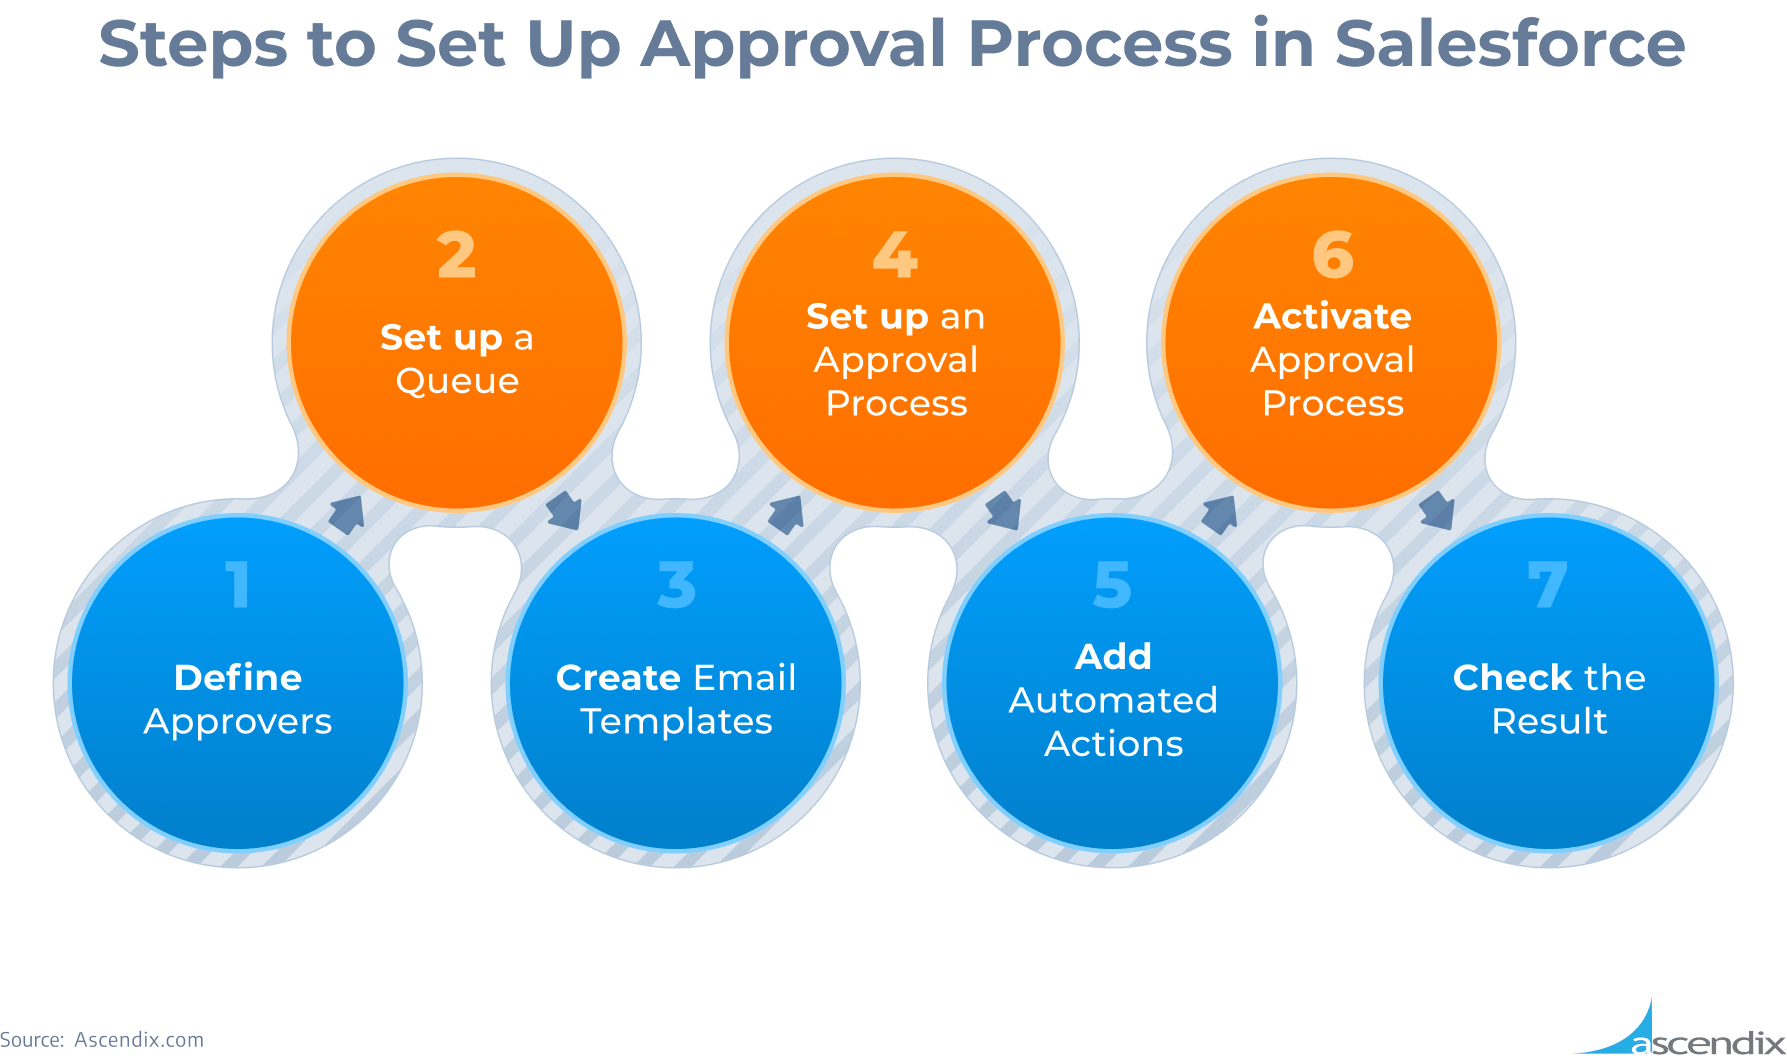
The Salesforce approval process is an automated workflow that allows organizations to approve records within Salesforce. It helps streamline the decision-making for tasks that require approval, such as discounts, expenditures, or contract terms.
We have created a video detailing the setup of an approval process for Deals in AscendixRE CRM, which is specifically designed for the commercial real estate industry.
Explore our article for an in-depth look at the fundamentals of Salesforce’s native approval process and the instructions of the Salesforce approval process setup that apply to all Salesforce environments.
Sales professionals frequently require transaction validation from internal departments like legal or accounting, typically resulting in extensive email correspondence to secure confirmations.
Recognizing the time-intensive nature of this process, Salesforce offers a built-in approval mechanism.
The Approval Process in Salesforce stands out as one of the most versatile features, offering vast potential for automating approvals across your organization for:
With this functionality in place, approvals can be efficiently requested with just a single click, streamlining the entire procedure.
How to Set Up Approval Process in Salesforce | Ascendix
To start the preparation process, you need to decide who is an Approver in your process and set up a Queue.
An approver can be a designated individual or a group of people known as a queue. For instance, we’ll establish queues for the Leasing department heads and the Legal Team.
Here’s how to set it up:
Step #1. Go to ‘Setup’ > ‘Quick Find‘ box > start entering ‘Queue‘. Select Queues and click ‘New‘.
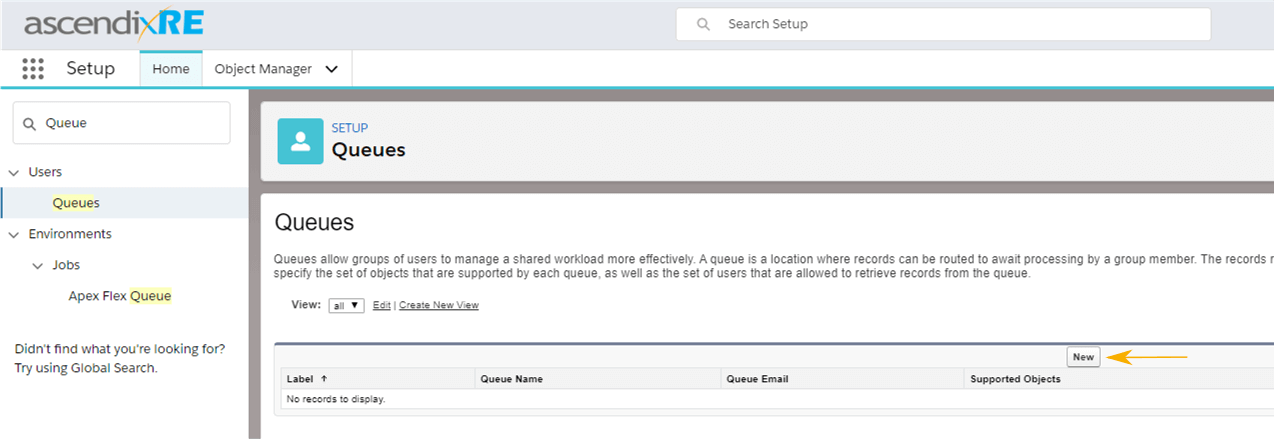
Select Queue from Setup
Step #2. Add the ‘Queue Label‘, and choose if you wish Salesforce to send emails when new records are added to the ‘Queue‘.
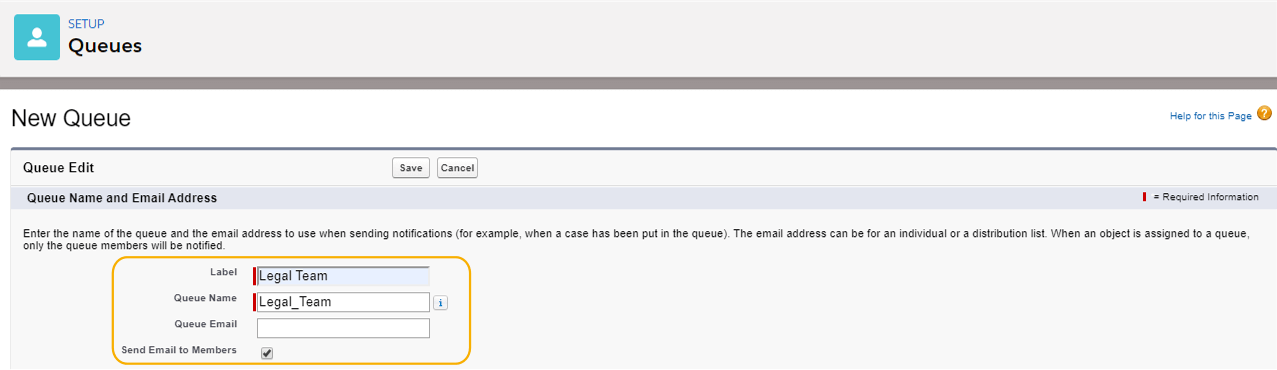
Define Queue Name and Email Address
Step #3. Decide what objects the Queue should apply to.
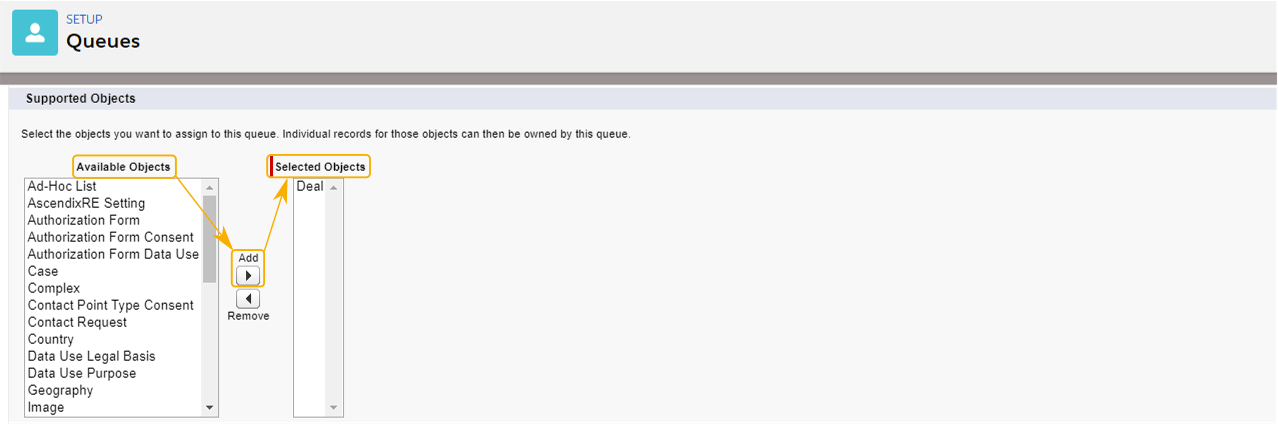
Set Queue-Supported Objects
Step #4. Add Queue members (one or multiple users) and ‘Save‘.
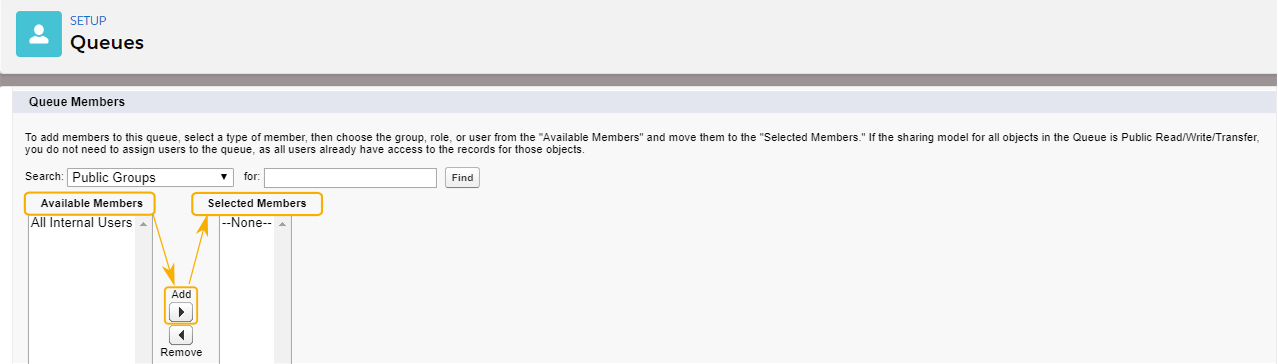
Add members to the Queue
Step #5. Repeat Step 1 to create the Leasing department heads’ Queue.
We offer all types of Salesforce consulting services such as implementation, integration, customization, administration, AppExchange app development.
Approvers receive email notifications alerting them to records requiring their review.
To initiate email notifications, an email template is required.
In our example, we’ll craft a simple text-based notification to inform approvers about deals in the negotiation phase that need their approval.
Step #1. From Setup enter ‘Classic Email‘ in the ‘Quick Find‘ box > select ‘Classic Email Templates‘ > ‘New‘
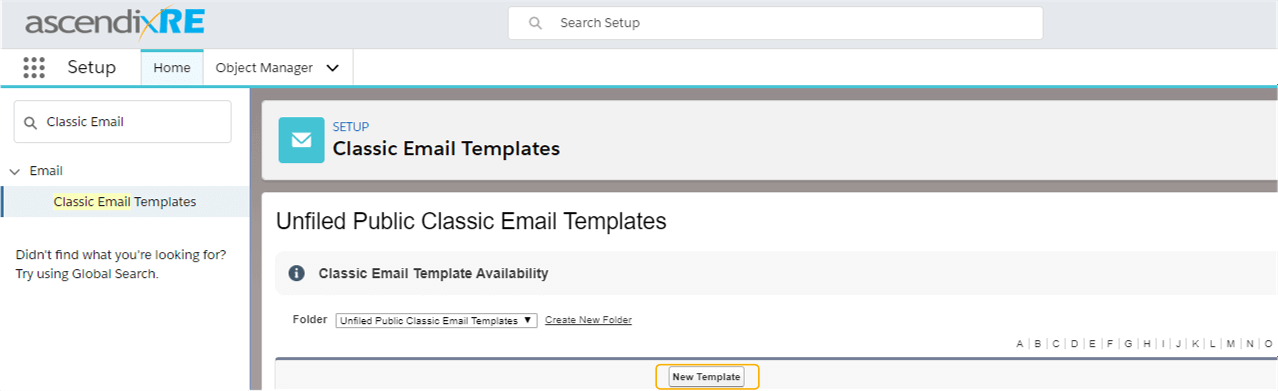
Find Classic Email Templates from Setup
Step #2. Select Text Type > Next.
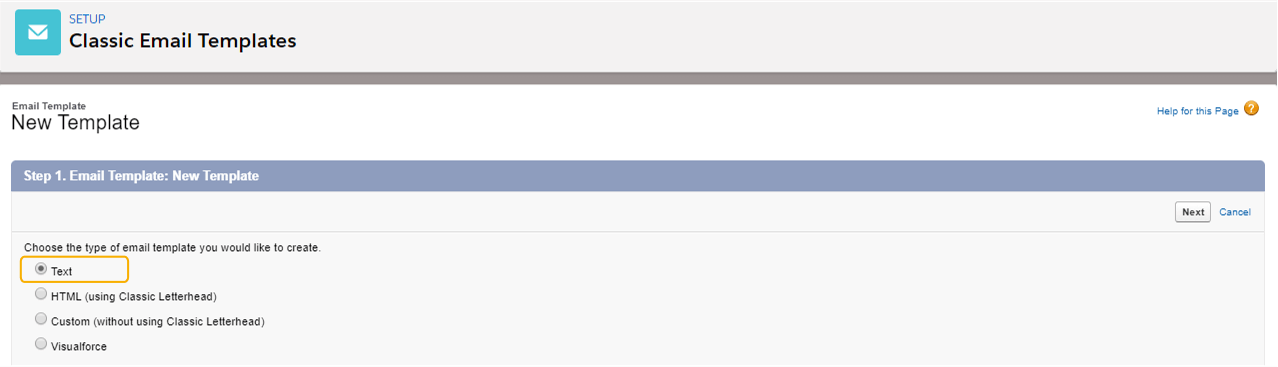
Choose Type of the Email Template
Step #3. Select a folder to store your template and check ‘Available For Use’.
Step #4. Enter the name, description, and subject of your template and the text of your message.
Step #5. Click ‘Save’ to save your email template.
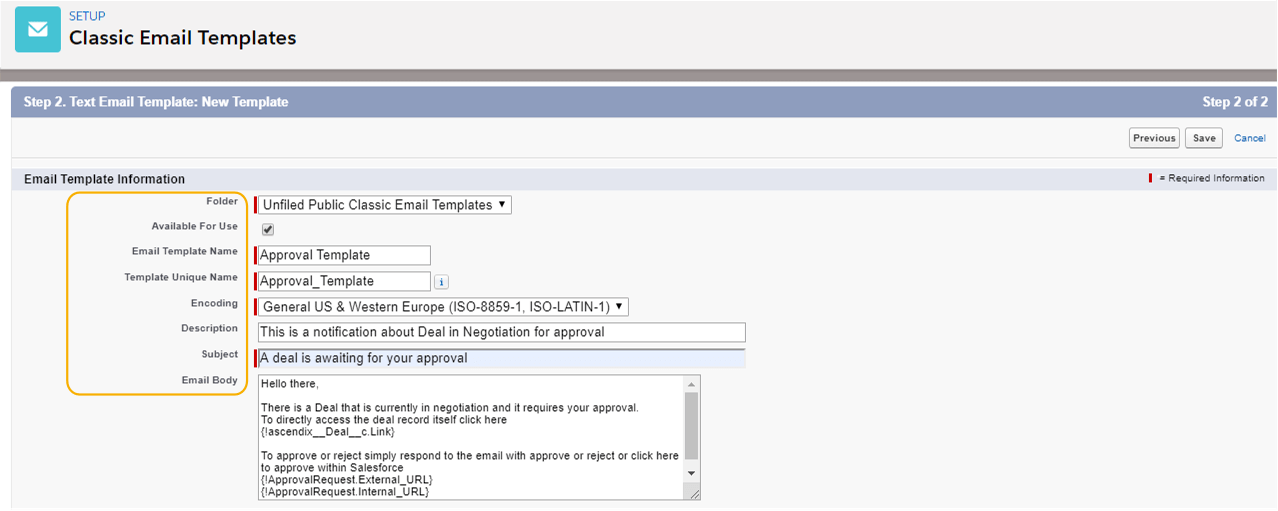
Email Template Basic Information
Note that you can add the merge fields in the email body.
In our example, we added the links to a Deal record so an Approver can quickly review the Deal.
We have a development team to help you customize your Salesforce solution, configure and integrate it with other systems.
Now we’re going to trigger an Approval Process in Salesforce so that our Leasing department heads, and a Legal Team can review and confirm a Deal.
To set it up you need to:
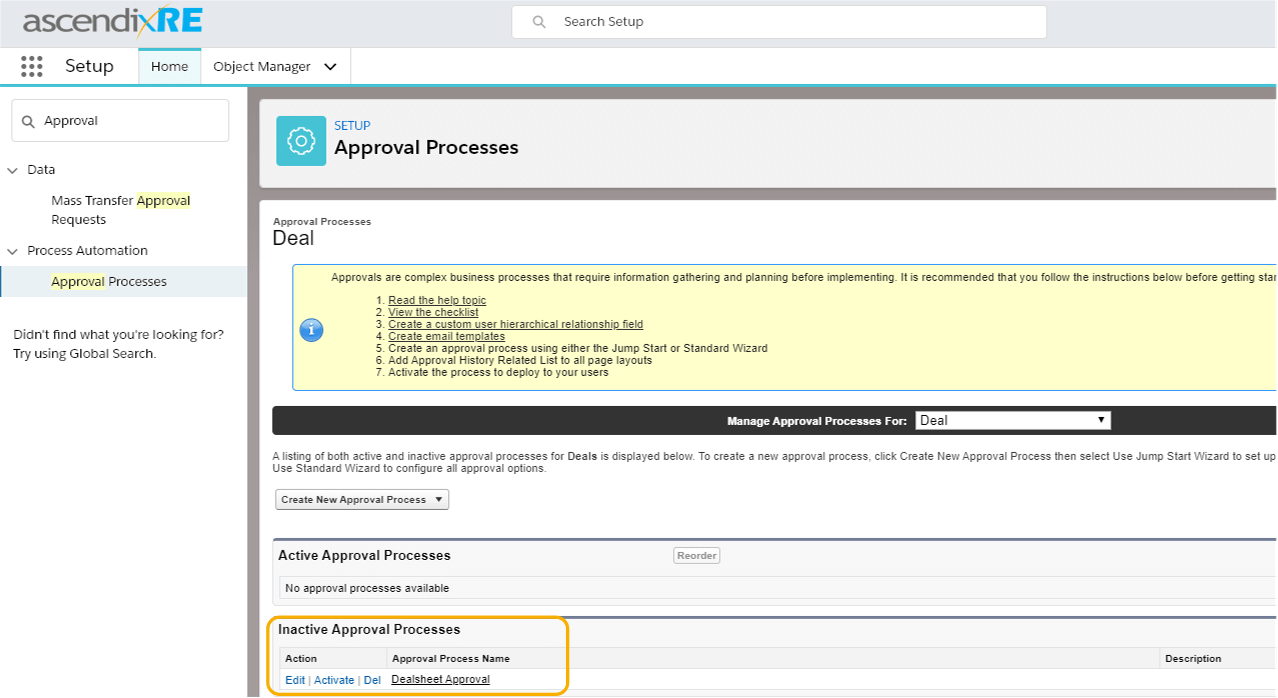
Step #1. Go to Setup > start entering ‘Approval’ in the ‘Quick Find’ box > select ‘Approval Processes’
Step #2. Select an Object your Approval Process is going to be applied to
Step #3. Create ‘New Approval Process ‘> Use Standard Setup Wizard
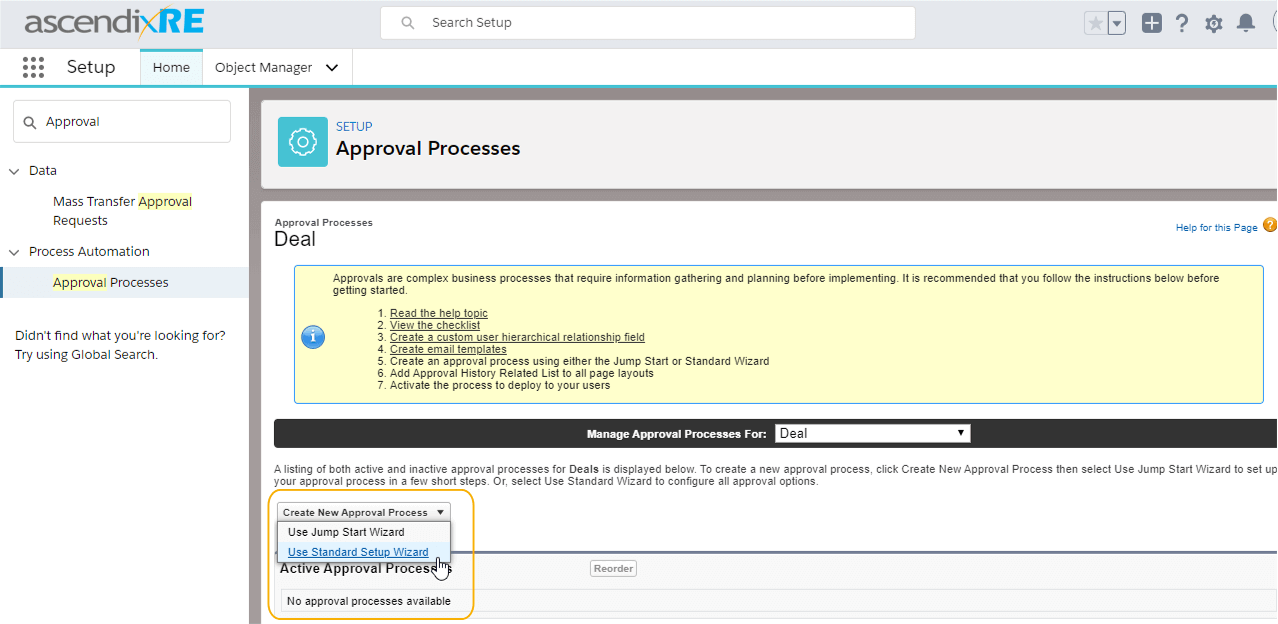
Starting a New Approval Process
Step #4. Name your Approval Process and Add a Description, then click ‘Next’.
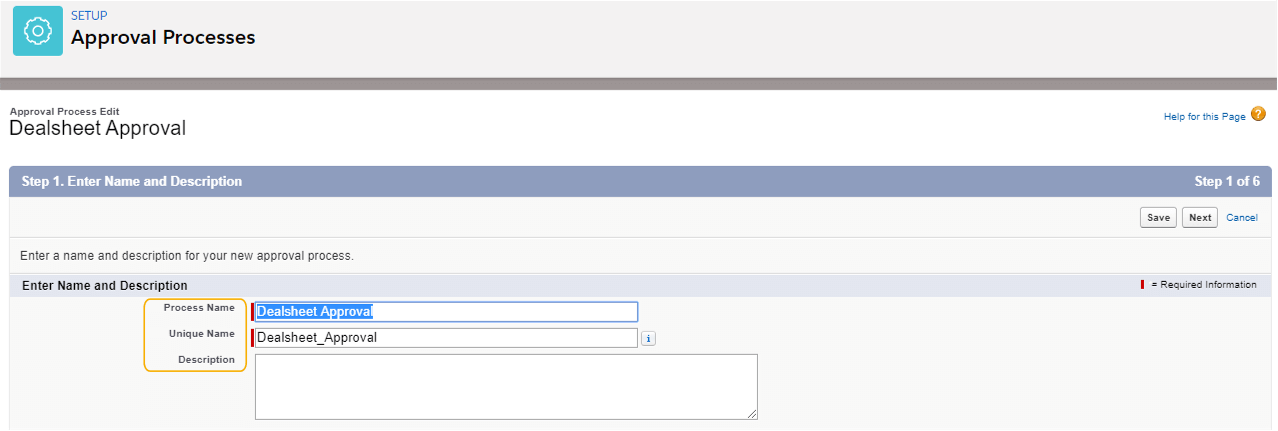
Adding Name and Description for Approval Process
Step #5. Define if records, triggered by your process should meet any specific criteria, then click ‘Next’.
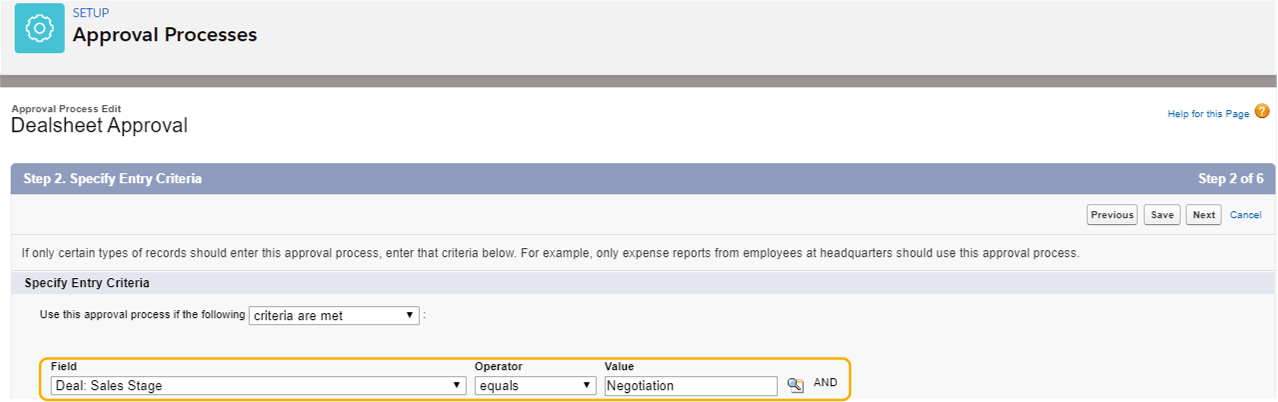
Criteria for records that should be used by the Approval Process
In our example, we have selected ‘Deal’ from the ‘Manage Approval Process’ drop-down list. Also, in the ‘Specify Entry Criteria’ step, we defined that the ‘Deal Sales Stage’ should be equal to ‘Negotiation‘, which means that this Dealsheet Approval Process will run when a Deal goes to Negotiation Sale Stage.
Step #6. Choose an Automated Approver and record editability properties > ‘Next‘.
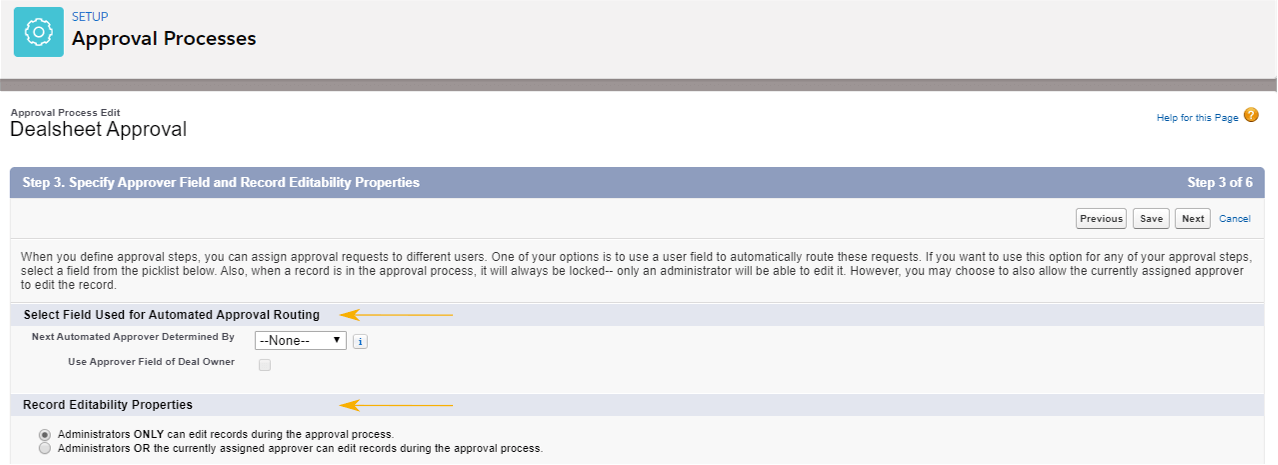
Set up an Automated Approver and a Record Editability Properties
In the provided example, the approver selection field is intentionally left blank, requiring users to manually designate the approver.
Additionally, you can define the record’s editability settings, which can be restricted to Administrators alone or extended to both Administrators and designated Approvers.
In our setup, we have chosen to limit edit permissions to Administrators only.
Step #7. Select an approval notification template: email, post, or both, and click ‘Next‘.
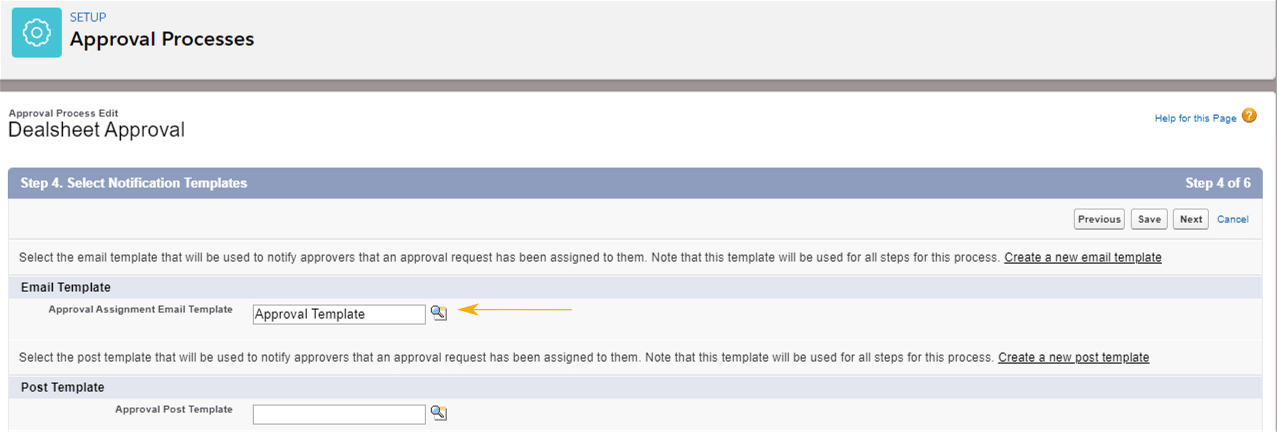
Email Notification Template
Step #8. Choose fields to be displayed for Approver on the Approval Page layout.
Step #9. Decide, display, or not the approval history information.
Step #10. Define Security Settings.
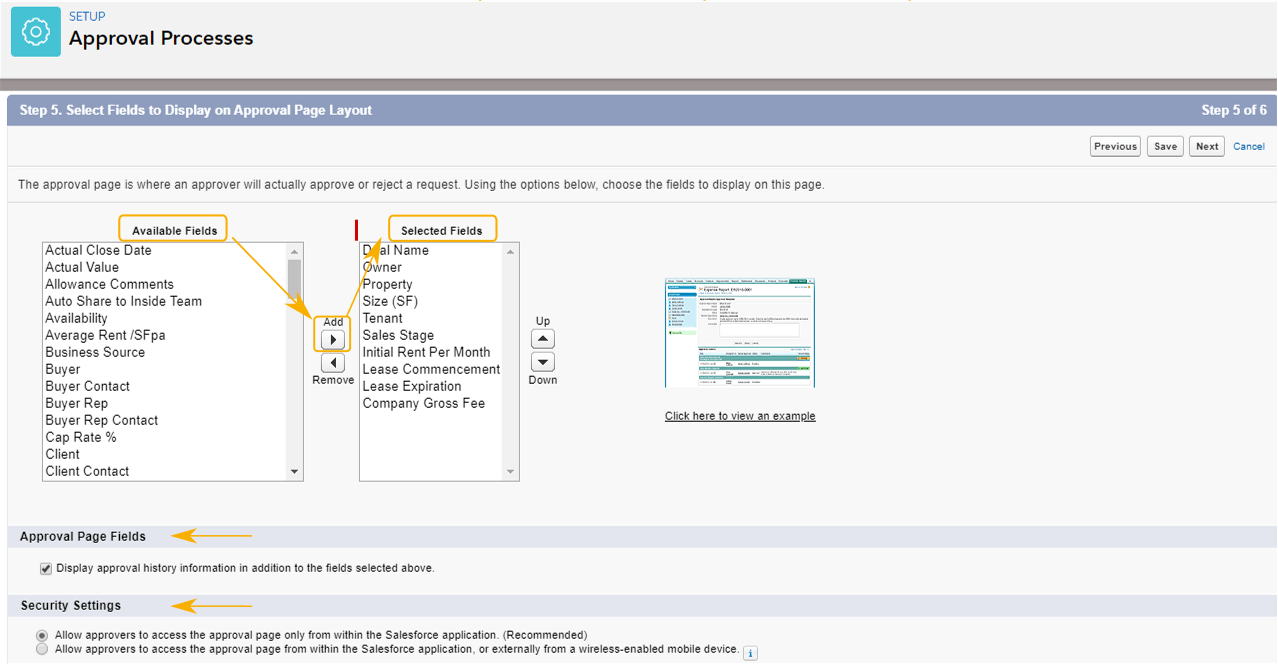
Approver Page Layout, Approval History, and Security Settings
Step #11. Select whom to allow to submit the initial request for approval.
Step #12. Define the Page Layout and Approval Recall Settings > Save.
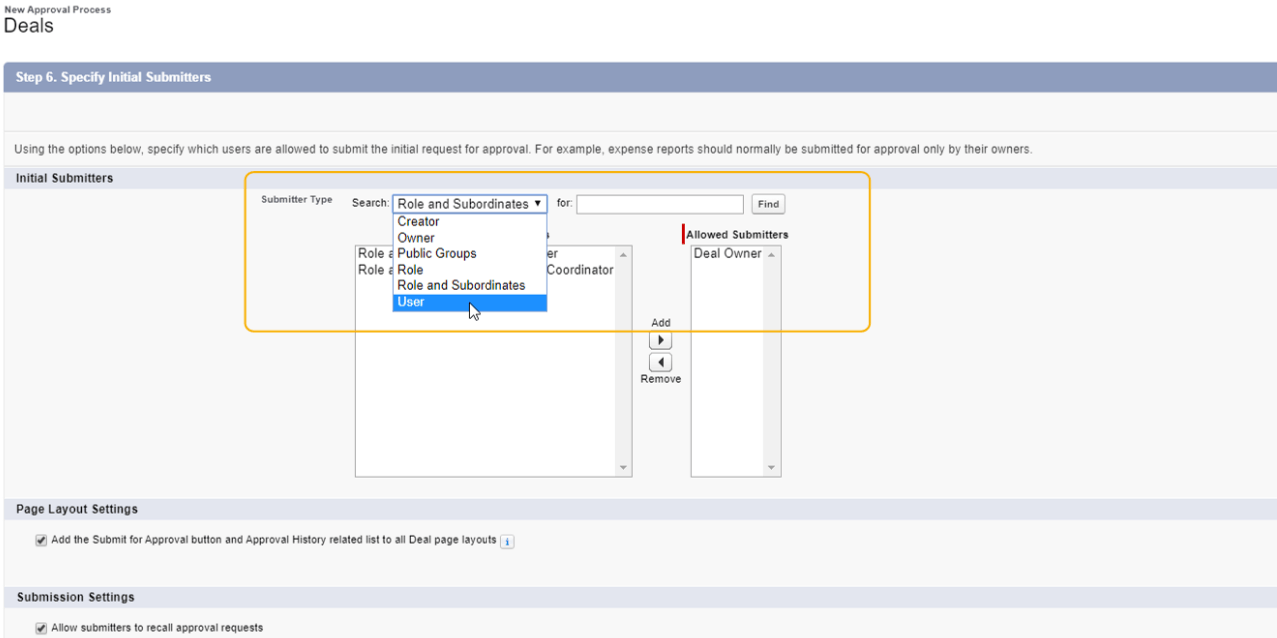
Select the Submitters, Define Page Layout and Approval Recall Settings
We’ve selected the Approval Email Template, which was created in Step 2.
Now it’s time to add an Approval Step to an Approval Process. Approval Steps define a sequence of approvals for a process.
Step #1. Select Approval Process from the list of Processes > Approval Steps > New Approval Step.
Step #2. Add Name, Description, Define Step Number > Next.
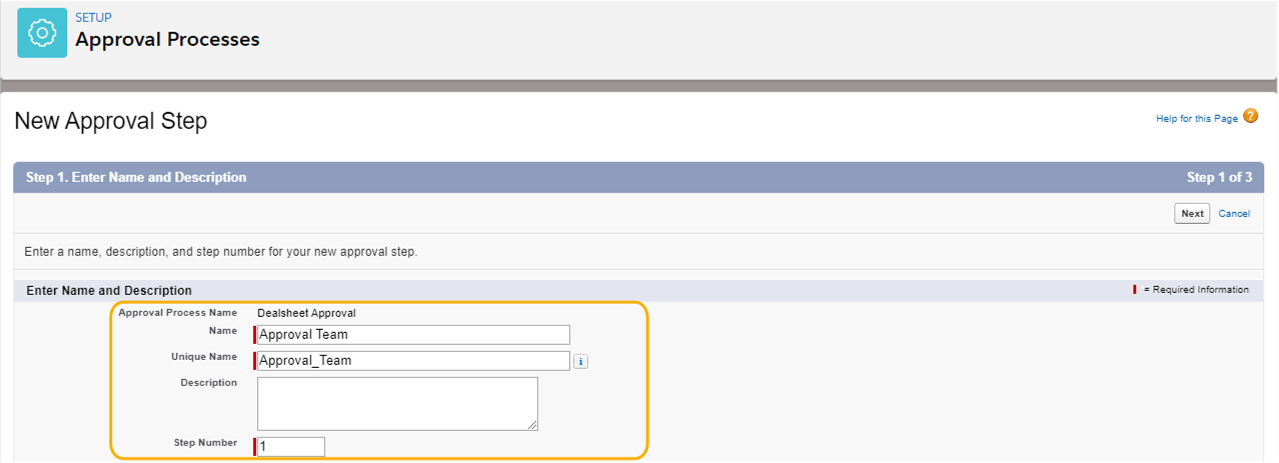
Name, Description, Number of Approval Process Step
Step #3. Set the records entry criteria for this particular step and click Next.
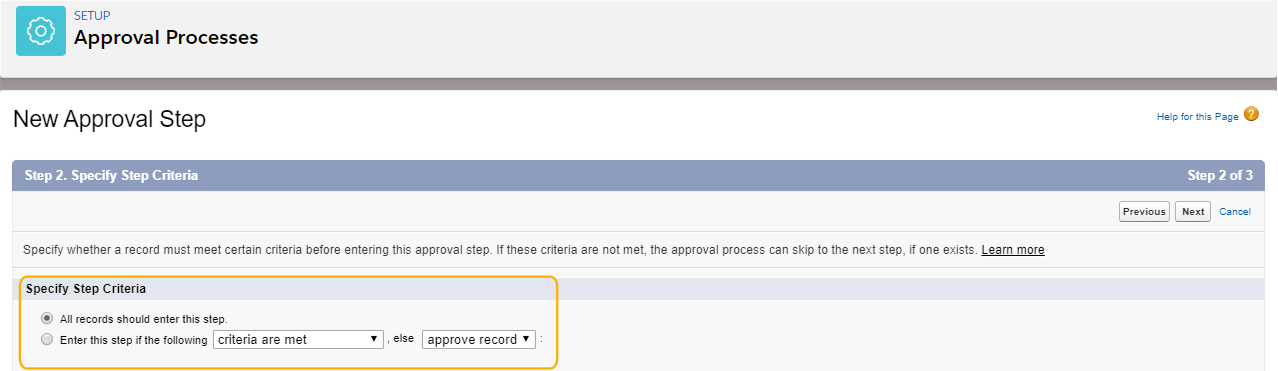
Specify Records Entry Criteria for Approval Process Step
You can choose either all records or records that match certain criteria and define such criteria.
In our example, we’ve selected All records should enter this step option.
Step #4. Define a user, or a group, who should approve records that entered this step > Save.
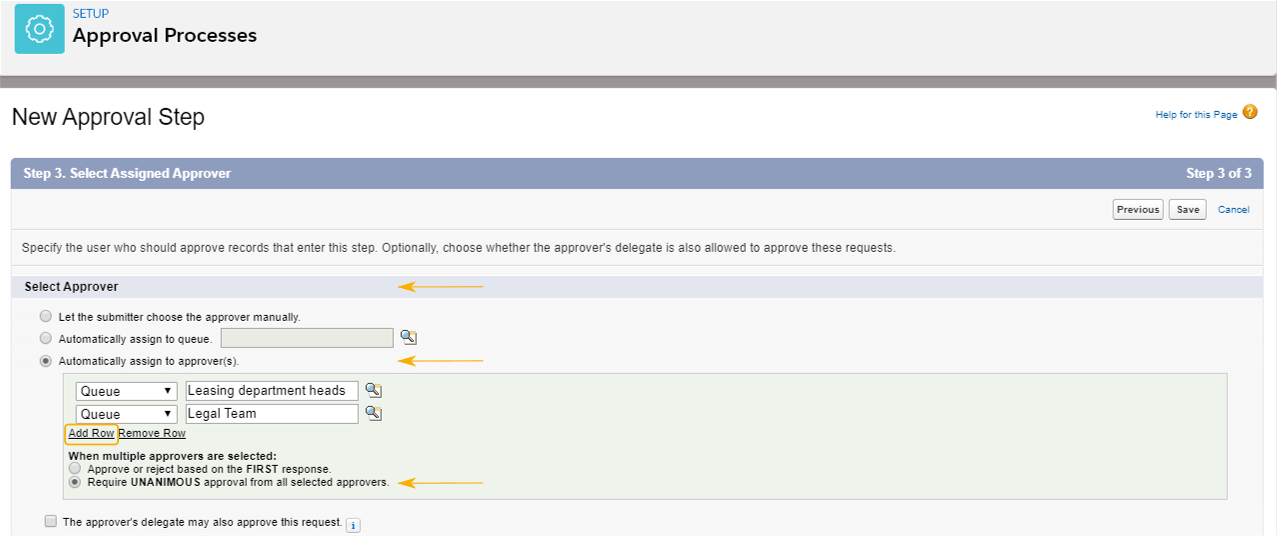
Select Approver(s) for Approval Process Step
The approval assignment can be configured to allow submitters to manually select an Approver, designate a single queue, or appoint multiple Approvers—comprising Users, Queues, or Related Users.
In our approach, the queues we established in Step 1 were nominated as the initial Approvers, with additional queues added via the ‘Add Row‘ feature.
For scenarios involving several Approvers, you have the option to either proceed with the ‘First Response‘ rule, where the initial decision received determines the outcome, or the ‘Require Unanimous Approval’ rule.
We have implemented the latter, stipulating that approval is only granted if all Approvers consent, with any rejection leading to the denial of the approval request.
Following the setup, you can configure Automated Actions at various stages of the Approval Process, including the initial submission, final approval, rejection, or recall.
In our example, we have maintained the default settings for Initial Submission Actions, Final Approval, Final Rejection, and Recall Actions, which determine whether a record remains locked or editable upon approval or rejection.
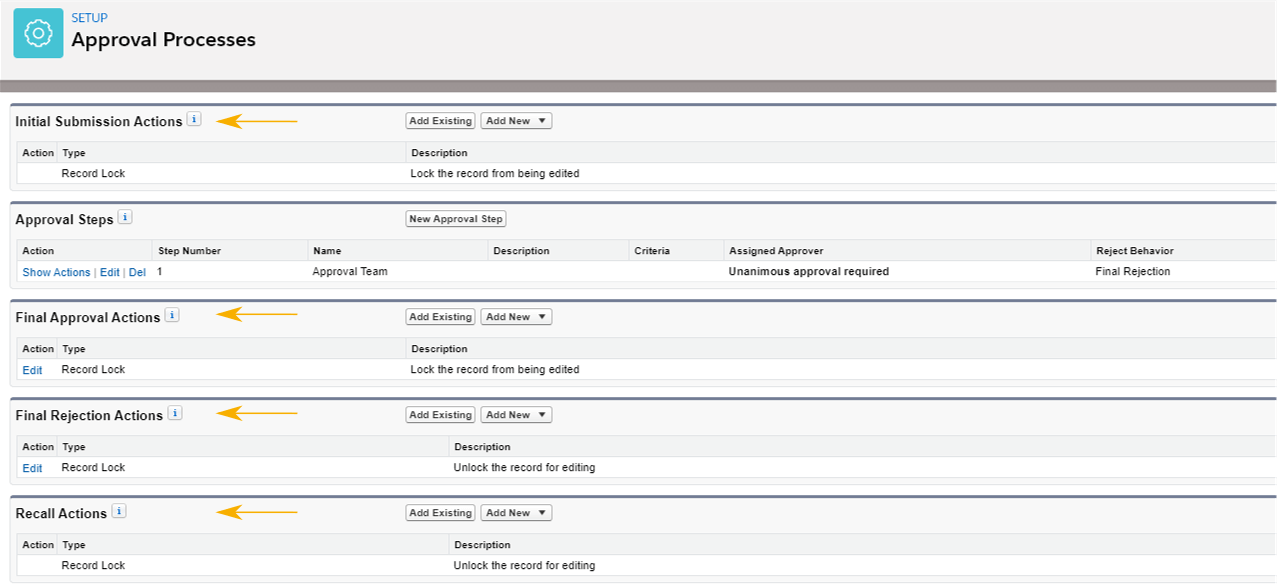
Actions for Approval Process
Step #4. Activate the process.
Approval Process Activation
Finally, we can get back to the Deal record, and check, if the process works as defined. To do that:

Deal record Submitting for Approval
In our example, we initially chose a Deal at the Tour stage and encountered an error indicating no relevant process was available because our Approval Process targets Deals at the Negotiation stage. To proceed, we must first update the Deal’s Sales Stage to Negotiation.

Deal record on Negotiation Sales Stage Submitting for Approval
Upon successful submission, the Approval History is automatically updated to document the submitter, their comments, and the designated Approvers.
Note that if a record includes Notes and Attachments, they are not directly viewable in the approval form. Approvers need to visit the actual Deal record to access these attachments.
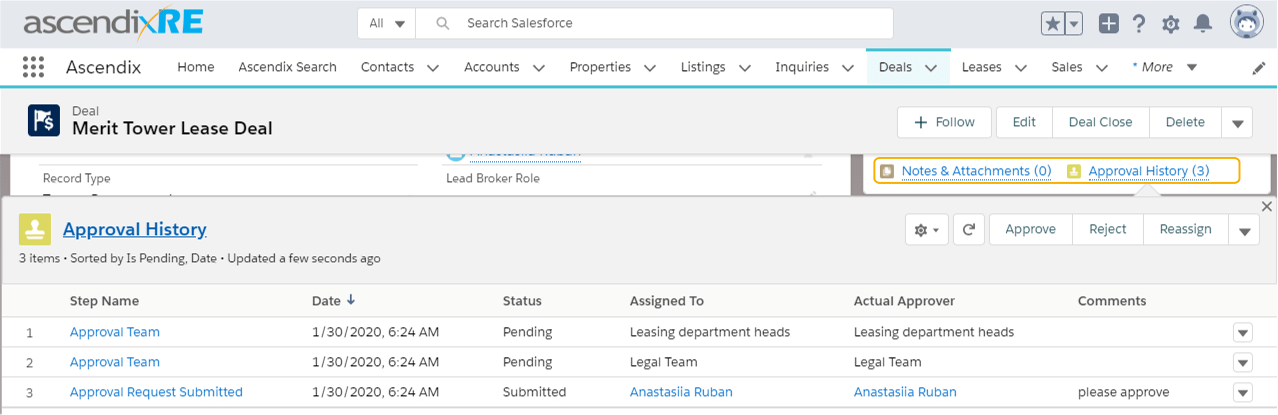
Related Records for Approval
Next, we’ll examine the email notification sent to Approvers, which alerts them to items pending their approval.

Email Notification for Approver
The initial link in the email notification directs Approvers to the Deal’s record; however, this view does not facilitate the approval or rejection actions.
For an efficient review, Approvers should use the provided links to access the records specifically queued for approval.
Additionally, you can check the Considerations for Email Approval Response to learn more about approve or reject through email options
On the approval record, Approvers are presented with key Deal information, as configured in Step 3 of the Approval Process setup. Here, they can decide to approve or reject the Deal and add any pertinent comments.
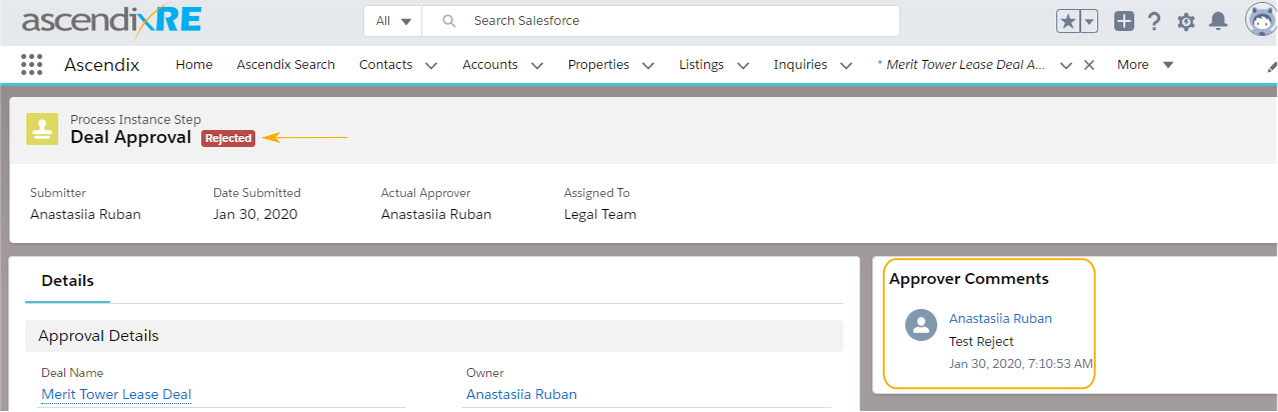
Comments on a Deal Approval Record
Modifications can be reviewed on the Deal Record’s Related Page.
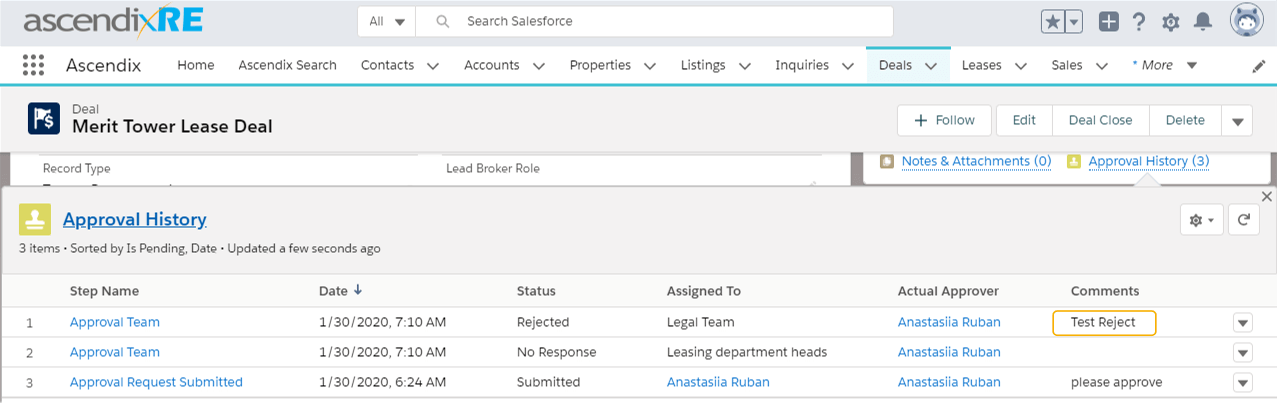
Changes on a Deal record after Approver resolution
To gain a comprehensive understanding of how the Salesforce approval process operates, view our detailed YouTube tutorial.
Ascendix offers specialized Salesforce services tailored to enhance sales productivity, streamline departmental collaboration, and improve CRM efficiency. Our expertise ranges from strategic consultation to custom Salesforce development.
Our Salesforce consultants will assist you in selecting the ideal tools and features to fine-tune your Salesforce environment, focusing on transformative strategies that bolster data-driven services and foster comprehensive customer engagement.
With our in-depth experience, we empower your platform with customized workflow approval processes, advanced performance management, and insightful reporting. Our integration services ensure a seamless blend with third-party apps and other systems, facilitating your growth and technological evolution.
Additionally, we specialize in developing custom Salesforce applications that not only fulfill your specific business requirements but also prepare you for listing on the AppExchange.
At Ascendix, we cultivate a culture of productivity and unity across all departments within Salesforce’s cohesive platform.
Need a comprehensive tutorial on how to set up the approval process in Salesforce?
Book a free CRM consultation with our seasoned industry professionals to leverage advanced solutions for your business needs.
Salesforce approval processes automate how records are approved, ensuring all changes meet company policy by routing them through designated approvers for acceptance or rejection.
In Salesforce, the contract approval process is initiated when a draft contract is submitted. It involves configuring a workflow that notifies approvers via email and updates the contract’s status upon approval, rejection, or recall.
Anzhelika is a seasoned B2B content marketing strategist with extensive experience in elevating corporate profiles through compelling content. At Ascendix, she offers a wealth of knowledge in Salesforce consulting, providing valuable tips, tricks, and comprehensive guides. Additionally, Anzhelika stays at the forefront of the industry, delivering expert analysis on the latest Salesforce tools and emerging technology trends.
 (29 votes, average: 4.97 out of 5)
Learn how to boost your Salesforce Org features with our CRM Academy! Subscribe to our newsletter and get fresh Salesforce e-books, checklists, and tips & tricks right to your inbox!
very informative and helpful