Want to Maximize your Salesforce Investment?
We will teach you how to use CRM software to the fullest without overpaying for unnecessary functionality.
The Salesforce Winter ’25 release is approaching, and detailed release notes have been shared, providing an early look at the upcoming enhancements to your Salesforce environment.
In this post, we’ll explore the standout features in the SF Winter ’25 release for admins, developers, and users, highlighting how these updates can transform your Salesforce experience.
The Salesforce Platform Login license provides flexible access to custom apps built on the Salesforce Platform for internal users.
This license model eliminates the need for seat-based licenses by allowing you to pay based on daily unique logins, making it ideal for users who require infrequent or occasional access.
The Salesforce Platform Login license will be available starting October 15, 2024.
To maintain optimal performance, Salesforce has introduced a limit on the number of inbound emails that can be queued after reaching your daily email limit.
The maximum number of emails that can be queued now matches your daily email rate limit. Once this limit is reached, any additional inbound emails will bounce.
Key Details:
Action Required:
It’s recommended that you review your email services and ensure the “Requeue Message” failure response option is used only for high-priority services to minimize disruptions.
We will teach you how to use CRM software to the fullest without overpaying for unnecessary functionality.
Customizing reports to meet your business needs is now easier with Einstein Report Formula Generation. This feature leverages Einstein Generative AI to assist with the technical work of creating row-level and summary formulas.
Simply describe the calculation you need in plain language, and Einstein will analyze the relevant data, suggest an appropriate formula, and handle the complex details.
Previously, creating formulas required deep knowledge of data models, objects, fields, functions, and the constraints of data and formula types.
How to Enable and Use:
Enable Einstein:
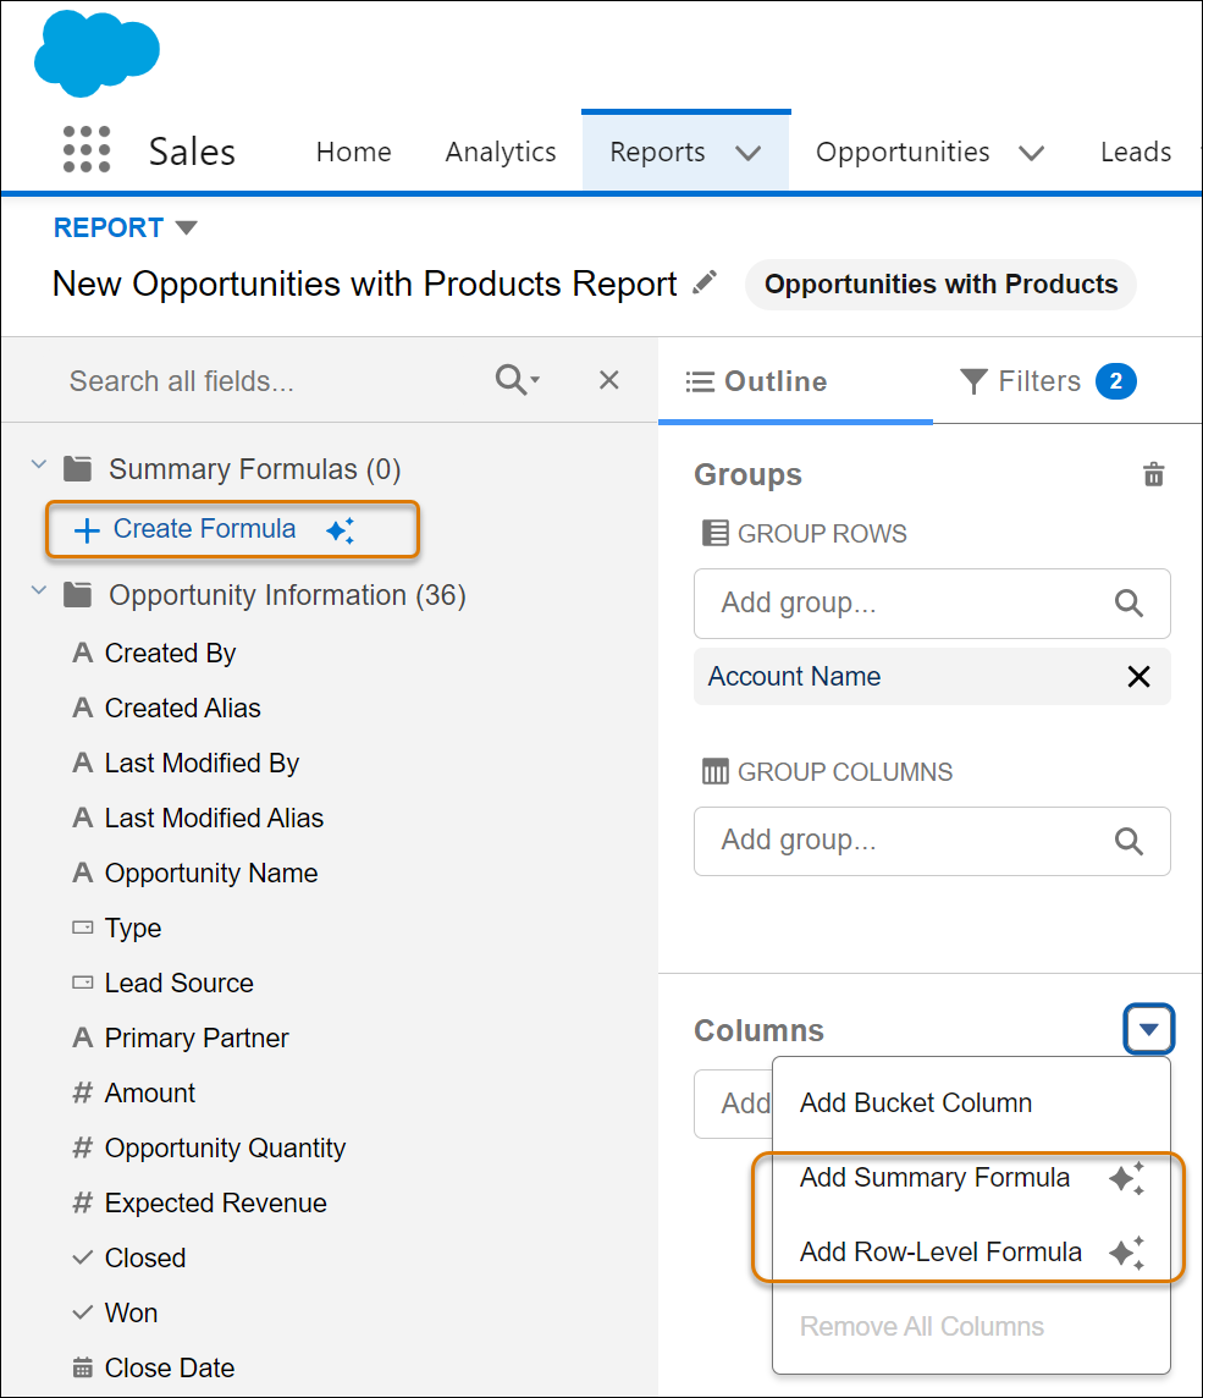
Einstein Report Formula Generation in Salesforce
Create Formulas in Reports:
If the Einstein formula is good, click Insert Formula and Einstein fills in all the fields.
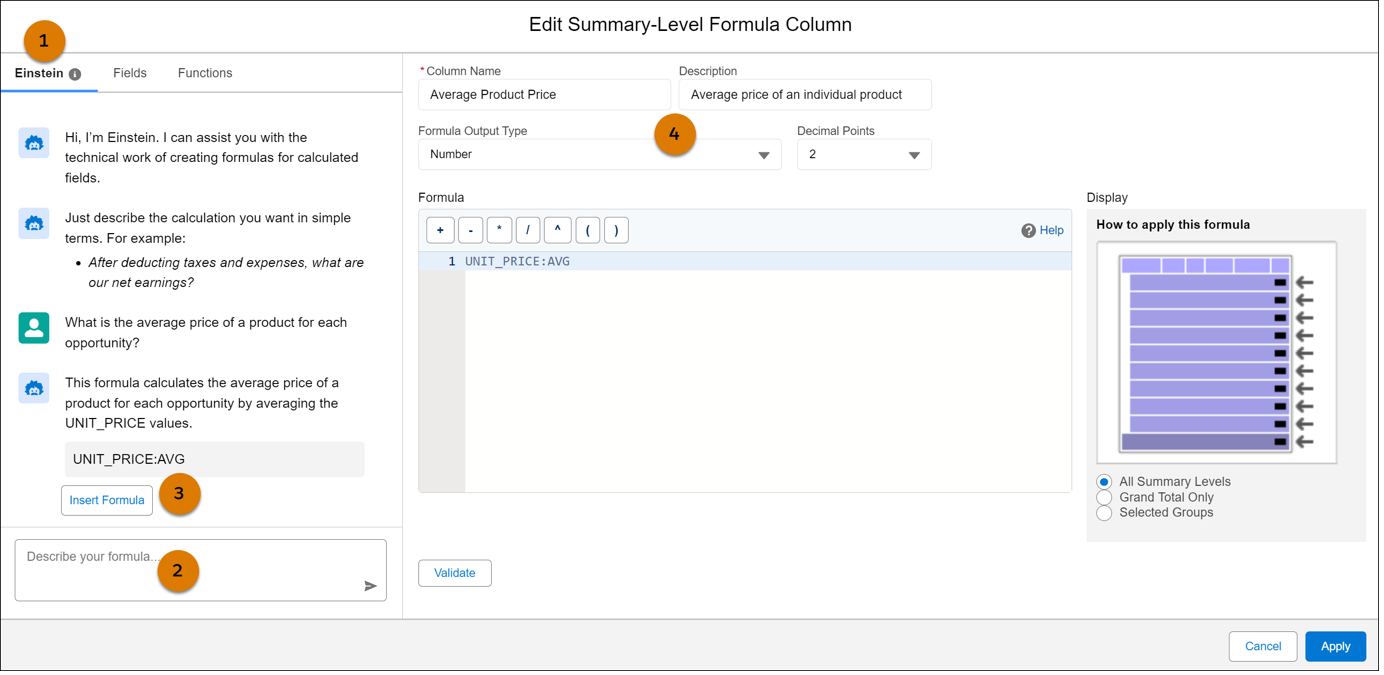
How to Edit Summary-Level Formula Column with Einstein Generative AI in Salesforce
The improved Custom Report page in Setup now offers enhanced features to help you manage your report types more effectively. With a more compact layout and additional functionality, you can easily find and create personalized list views of your custom report types.
The redesigned report type layout editor provides greater flexibility, allowing you to manage custom fields and sections more efficiently. Additionally, you can now add up to 1,000 fields in the report type layout using lookup fields.
How to Access:
Prerequisites: In Setup, use the Quick Find box to enter and select Reports and Dashboards Settings. Enable the Enhanced Custom Report Type Setup Page (Beta) option.
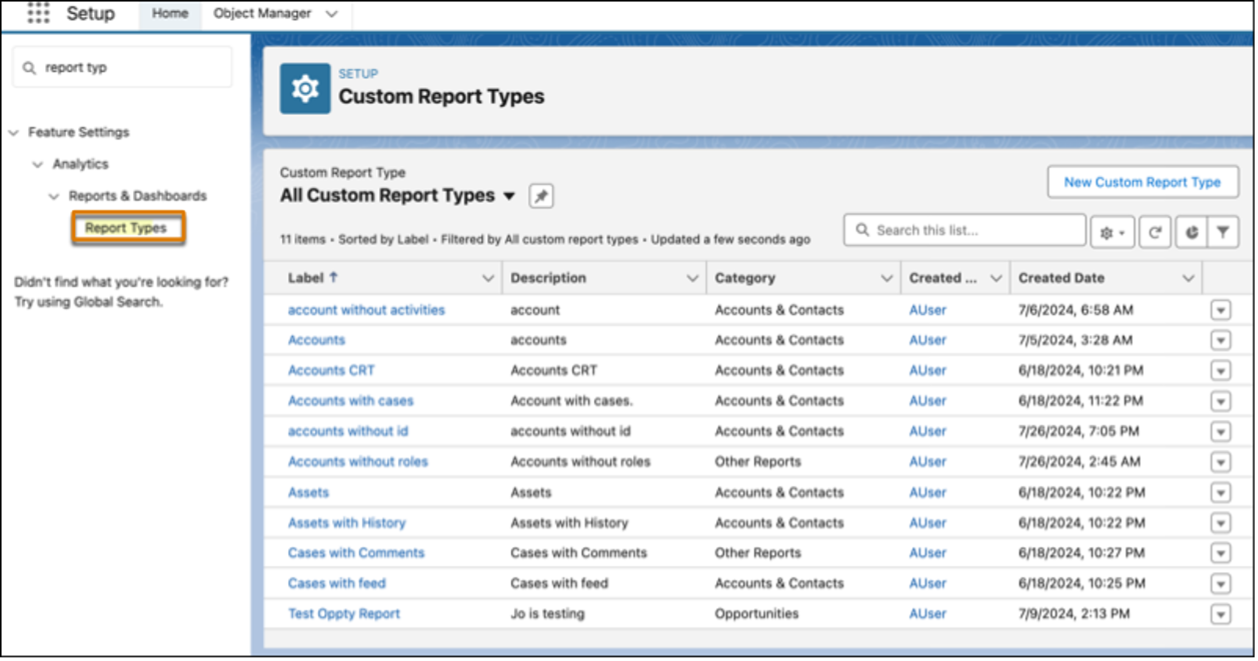
How to Find Report Types in Salesforce
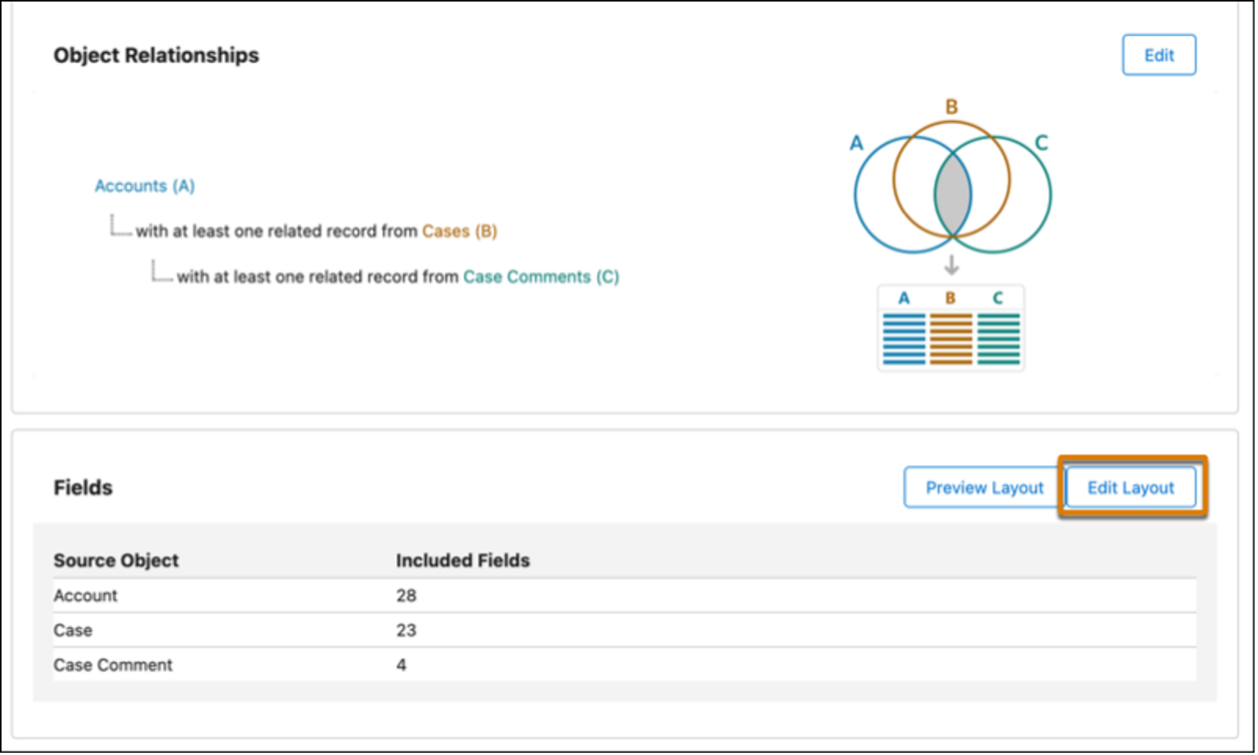
How to Edit Layout on the Summary Page of the Custom Report Type in Salesforce
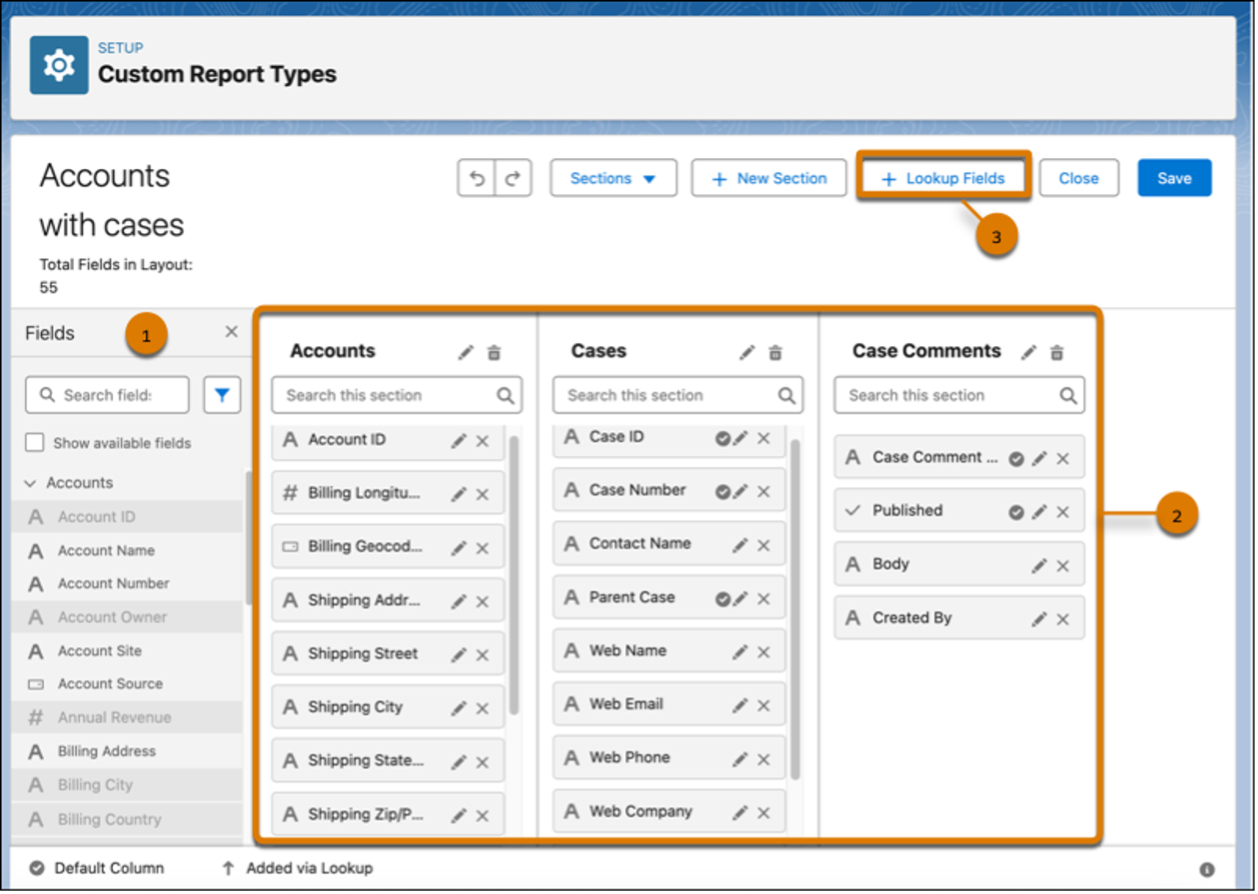
Enhanced Custom Report Types Layout
The Enhanced User List View allows you to view, sort, and filter user records in a list format while directly making inline edits to new entries.
This feature simplifies the process of updating and modifying user records by eliminating the need to navigate away from the list view.
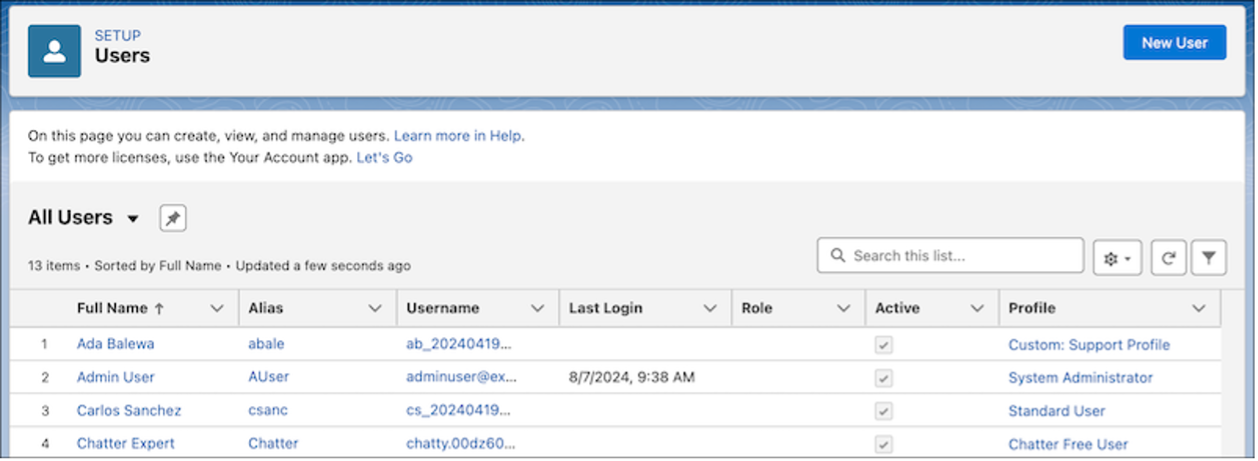
New Improved User List View
How to Enable and Use:
This update makes managing user records more intuitive and efficient, allowing for quick modifications directly from the list view.
Managing user permissions is now more straightforward with enhanced visibility into the sources of a user’s permissions. You can easily see which profile, permission sets, and permission set groups grant specific permissions to a user.
This includes details on assigned Object, Field, User, and Custom permissions, all accessible through the User Access Summary. Previously, identifying the origin of a user’s permissions required multiple queries or steps.
Now, this information is available with just a few clicks.
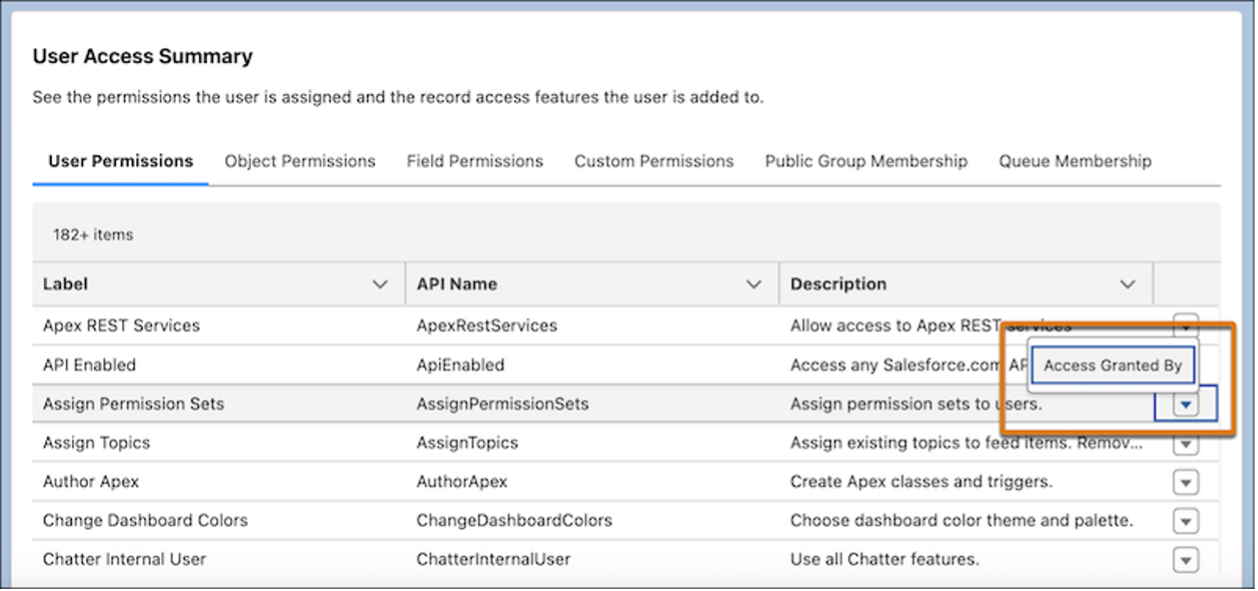
New Improved User Access Summary Interface
How to Access:
This update streamlines the process of understanding and managing user permissions, providing administrators with clearer insights and reducing the effort required for troubleshooting.
The new Object Access Summary in Object Manager provides a comprehensive view of the permission sets, permission set groups, and profiles that grant access to an object, along with the specific level of access granted.
This read-only summary allows you to quickly review object permissions, making it easier to troubleshoot issues, complete permission reviews, or determine how to grant user access.
How to Access:
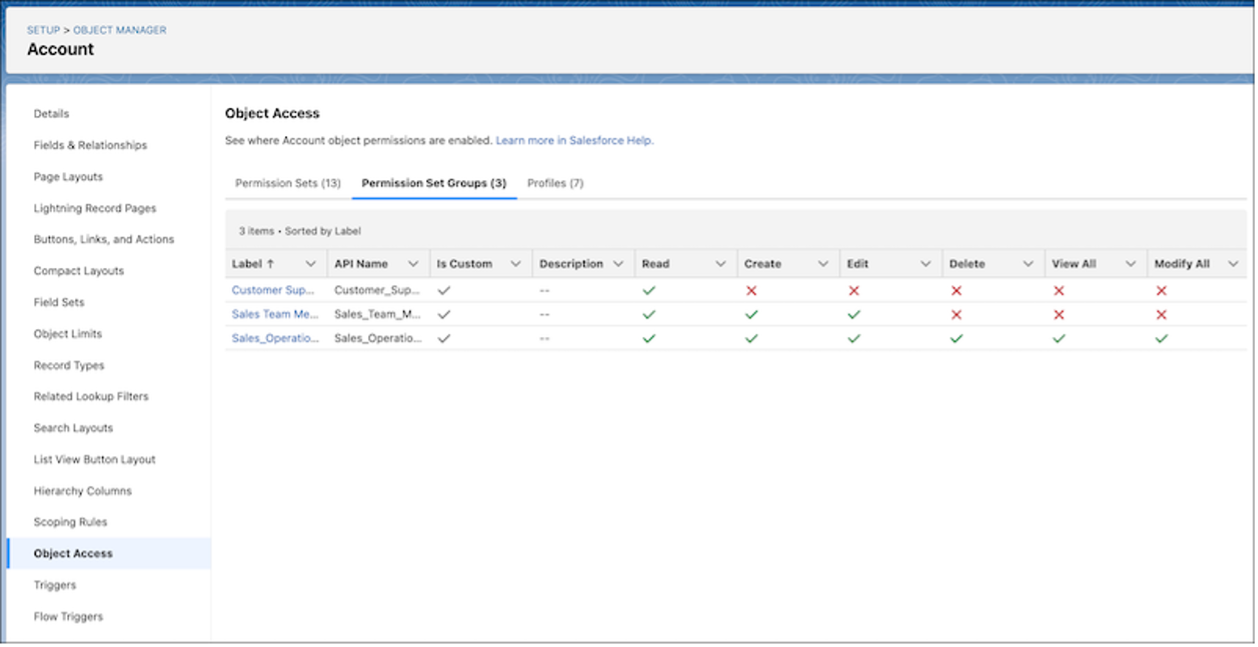
New Object Access Summary in Object Manager
With the new Dynamic Highlights Panel, you can now configure the most important fields directly within the Lightning App Builder, streamlining the process of setting up your record pages.
Unlike the previous method, where you had to use compact layouts in Setup, the Dynamic Highlights Panel allows you to add up to 12 fields, giving you more flexibility and control.
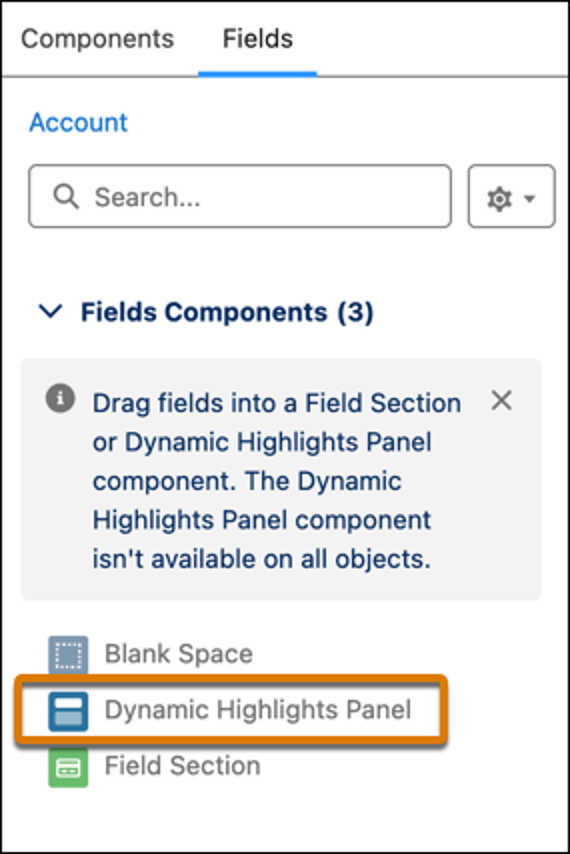
New Dynamic Highlights Panel in the Lightning App Builder
Key Features:
How to Configure:
Mobile Access:
While users can immediately see the Dynamic Highlights Panel on desktop, to make it visible on mobile record pages, you must enable it by navigating to Setup > Salesforce Mobile App > Dynamic Forms and Dynamic Highlights Panel on Mobile.
Conditional Formatting allows you to enhance record pages by applying custom icons and colors to fields, making it easier for users to quickly identify critical information.
This feature is available on Dynamic Forms-enabled pages in the Lightning App Builder. You can set conditions based on a field’s value or the values of other fields on the page, and have the formatting change dynamically as those conditions are met.
Key Features:
Availability:
The functionality will be rolled out starting with pre-release and sandbox orgs in early September 2024.
How to Apply Conditional Formatting:
How to Manage Rulesets:
To view, edit, or delete rulesets for an object, navigate to the Conditional Field Formatting node in Object Manager.
You can now add a brief description to public groups when creating or editing them, helping clarify their purpose or function.
This enhancement improves the organization and management of public groups, making it easier for administrators and users to understand the role of each group.
How to Add a Description:
Leverage out stellar team of Salesforce Admins and Consultants.
You can now use free-tier access to Event Monitoring to track unhandled exceptions in Apex code execution, providing an alternative to relying solely on unhandled exception emails.
By leveraging this feature, you can troubleshoot your Apex code more effectively by analyzing detailed information captured in event log files specific to the Apex Unexpected Exception event type.
Key Benefits:
How to Use:
Salesforce now offers a developer preview that allows you to author new Lightning Web Components (LWCs) using TypeScript. This enhancement aims to improve developer productivity and code quality.
Additionally, existing JavaScript-based LWCs can be converted to TypeScript, expanding the flexibility and maintainability of your projects. Previously, only JavaScript was supported for LWC development.
Important Note:
TypeScript support for LWCs is currently available as a developer preview. It is not generally available, and features may change or be deprecated without notice.
As such, it’s recommended not to implement critical functionality using this support until Salesforce officially announces its general availability.
How to Configure TypeScript Support:
Install TypeScript: Ensure that TypeScript v5.4.5 or later is installed in your environment.
Set Up Your Project:
Configure Module Resolution:
Recent updates may impact existing Apex code that depends on outdated SOQL error messages and functionality. This is particularly relevant if your code includes dynamic SOQL that parses error messages.
It’s essential to review these changes to ensure your code continues to function correctly.
Review all the new error messages in SOQL queries here.
Recent updates to several Lightning Web Components focus on enhancing both functionality and accessibility. These improvements are designed to deliver a more refined user experience while ensuring greater compliance with accessibility standards.
Key Updates:
lightning-datatable:
lightning-helptext:
lightning-input:
lightning-record-form, lightning-record-edit-form, and lightning-record-view-form:
lightning-modal:
The Create Records element in Flow Builder has been enhanced to streamline the process of creating or updating records based on whether a specified field value already exists in the database.
This update simplifies and speeds up the record-saving process by combining the create and update operations into a single element.
As a result, you can configure and maintain your flow more easily, reducing the risk of errors that might occur from handling these operations separately.
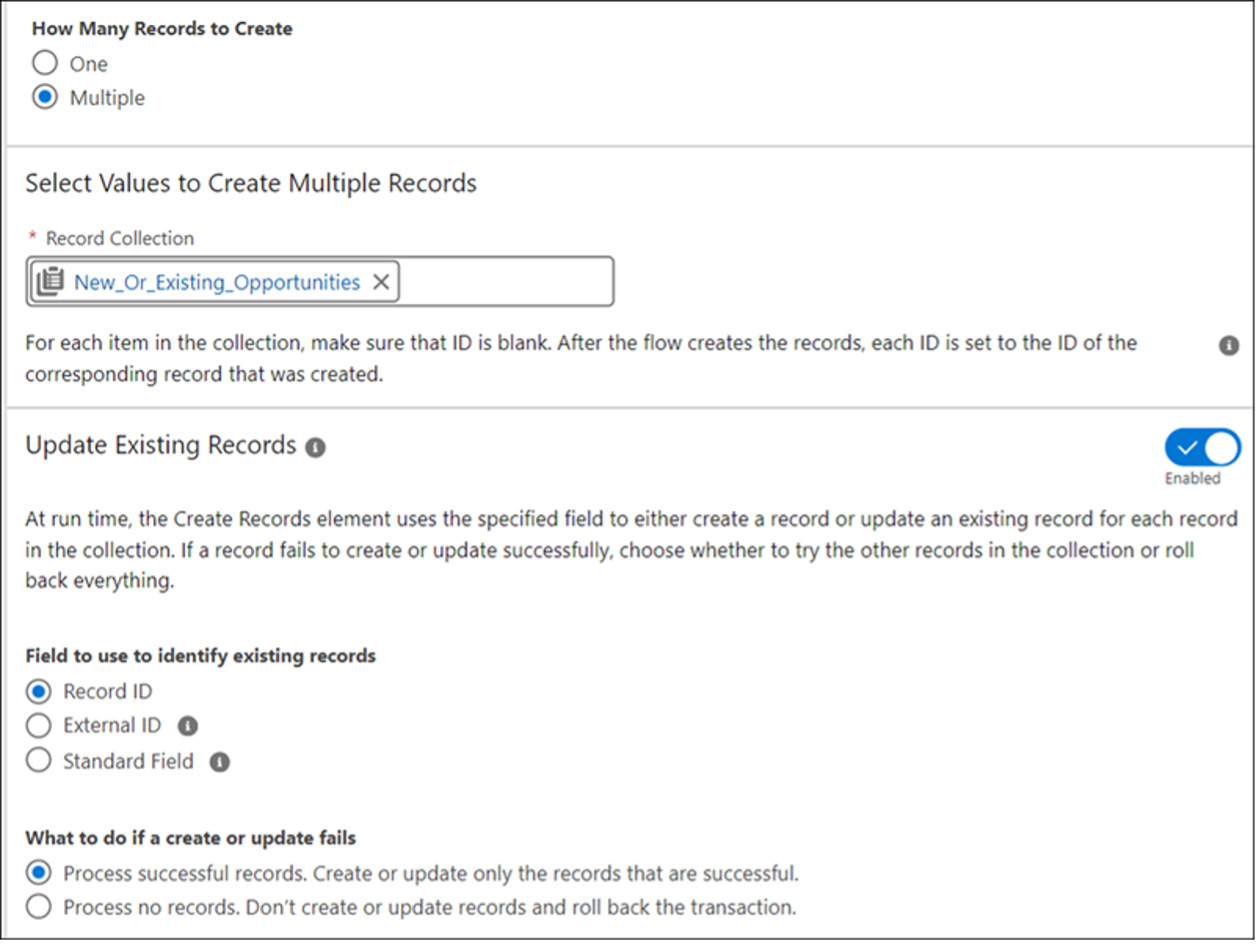
Improved Create Records Element in Flow Builder
With the Create Records element, your sales team can automatically determine whether to create a new record or update an existing one, ensuring data is always current without manual intervention.
How to Implement:
The Choice Lookup component in Flow Builder has been enhanced to allow for either single or multiple selections, up to 25 options. This new flexibility makes it easier to adapt the component to various business processes.
Previously, multiple selections through a lookup field were only possible using the Lookup component, but now you can achieve this functionality with the Choice Lookup component as well.
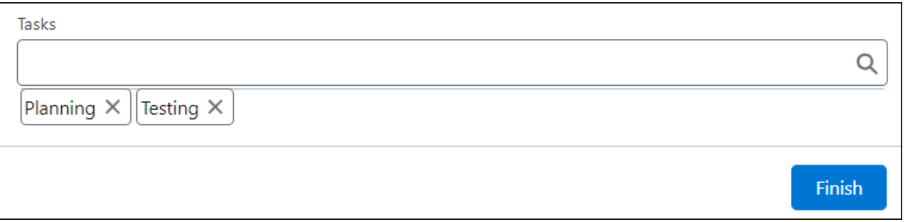
New Choice Lookup Component in Flow Builder
How to Implement:
The Action Button component in Flow Builder allows users to trigger screen actions directly with a button click, running an active auto launched flow and displaying the results on the same screen.
This feature reduces the number of screens required, enabling users to complete screen flows more quickly and with fewer errors.
Now generally available, the Action Button component includes several improvements since its last release.
Key Improvements:
How to Implement:
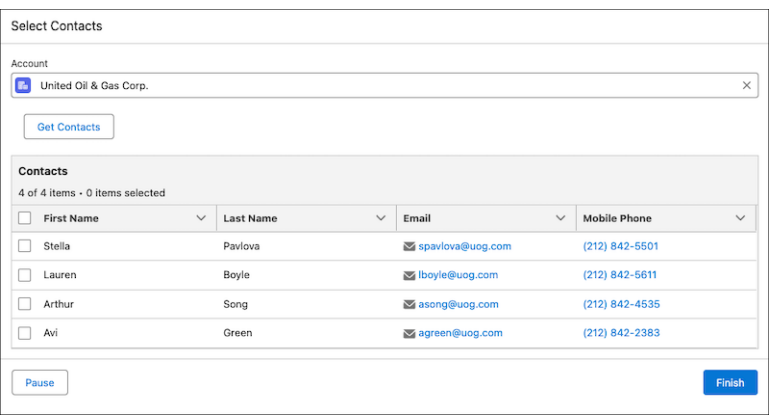
Example of The Action Button Component in Flow Builder
We offer all types of Salesforce consulting services such as implementation, integration, customization, administration, AppExchange app development.
Expand the availability of the Seller Home page to any standard or custom Salesforce app, giving sales users a comprehensive overview of their opportunities, accounts, leads, contacts, and daily agenda.
By applying the Seller Home template as the default home page for your app in Lightning App Builder, you can help sales team members start their day with a complete view of their business.
Previously, Seller Home was limited to only a few standard apps.
How to Implement:
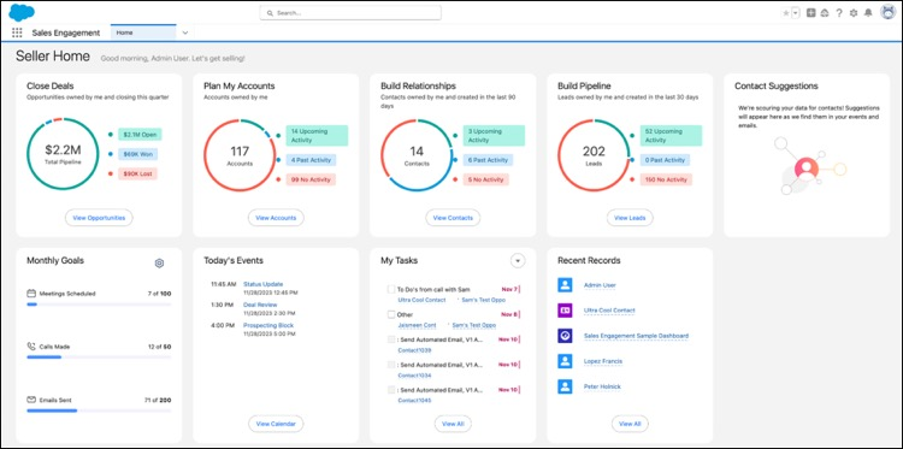
Seller Home Template in Salesforce
Account Plans in Salesforce enable you to strategically nurture existing relationships and grow key accounts.
This feature provides a centralized repository within Salesforce to research and analyze accounts, set actionable objectives, and monitor growth and development.
With Account Plans, you can maximize revenue potential while aligning your efforts with your customer’s goals and challenges.
Account Plans provide a structured approach to strategic account management, allowing you to:
Availability:
How to Implement:
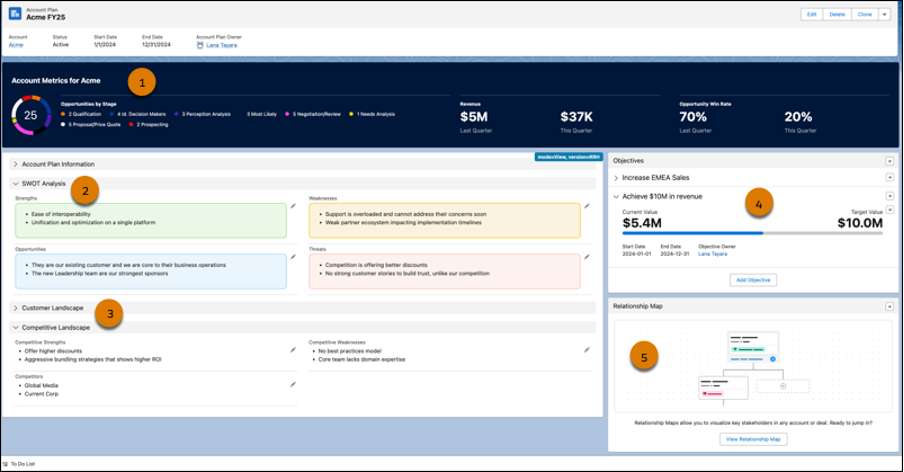
Example of Account Plans in Salesforce
Sales teams can now assign Opportunity Splits and Opportunity Product splits to specific territories, enabling a more detailed analysis of how different territories contribute to overall sales.
Previously, splits were only associated with the parent opportunity’s territory. This enhancement allows teams to generate reports that highlight each territory’s contribution to closing deals, as well as to forecast based on split amounts across various territories.
Key Benefits:
How to Implement:
Forecast submissions allow sales reps and managers to capture a snapshot of their best estimate of revenue or quantities expected to close during a forecast period.
Typically submitted weekly, these submissions provide a point-in-time view of the forecast, enabling management to compare the current forecast with previously submitted numbers and quotas.
This comparison helps ensure that forecasts are up to date and provides valuable insights into any discrepancies, thereby improving the overall accuracy of the forecast for the sales team and the business.
Key Benefits:
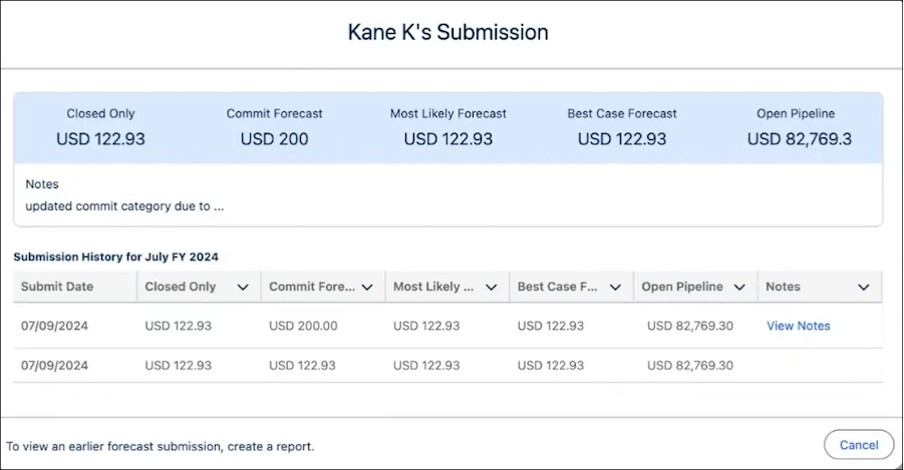
Capture Forecasts at a Point in Time with Forecast Submissions in Salesforce
How to Implement:
Important Note: Forecast submissions are only available for forecast types that do not include product families or other forecast groups.
We’ve helped multiple small businesses and large companies optimize Salesforce and adapt it to their teams’ needs.
My Service Journey (Beta) is a new tool designed to help you enhance your Service Cloud implementation by exploring various service areas and capabilities. Whether you want to improve your Help Site, optimize the Agent Console, or explore new features,
My Service Journey allows you to filter and discover capabilities based on your business goals, Salesforce edition, new features, Einstein capabilities, and more.

My Service Journey Interface in Salesforce
How to Access and Use:
You can now add a description when creating or editing a queue in Salesforce. This feature allows you to provide a brief summary of the queue’s purpose, function, or any other relevant information, making it easier for users and administrators to understand the role of each queue.
How to Add a Description
Maintain a clean and accurate database by using the duplicate prospect tool in Salesforce Optimizer. This tool helps you identify and merge duplicate prospect records, ensuring that your marketing team works with the most up-to-date and accurate information.
How to Use the Duplicate Prospect Tool:
You now have greater control over bulk prospect deletion requests with the ability to pause, resume, or cancel them using the Table Action Manager.
This feature applies to deletion requests initiated through both the API and the UI, providing flexibility and control over large-scale data management tasks.
Previously, these deletion actions could not be paused or resumed directly from the UI.
How to Use:
In this post, we’ve highlighted the standout features of the Salesforce Winter ’25 release, which are set to enhance the experience for users, admins, and developers alike by providing greater flexibility and efficiency.
We’re eager to hear about your experiences with these updates. Have you discovered any other noteworthy features in this release? Your insights are invaluable to us and the broader Salesforce community, so please share your thoughts and findings in the comments below.
If you need assistance with any of the following:
Book a free consulting call with us, and together we’ll find the best solution for your needs.
Anzhelika is a seasoned B2B content marketing strategist with extensive experience in elevating corporate profiles through compelling content. At Ascendix, she offers a wealth of knowledge in Salesforce consulting, providing valuable tips, tricks, and comprehensive guides. Additionally, Anzhelika stays at the forefront of the industry, delivering expert analysis on the latest Salesforce tools and emerging technology trends.
 (38 votes, average: 4.97 out of 5)