Want to Maximize your Salesforce Investment?
We will teach you how to use CRM software to the fullest without overpaying for unnecessary functionality.
The Salesforce Summer ’24 release is almost here! The anticipated release notes are now available, shedding light on many exciting new tools for SF administrators and developers.
Let’s explore the key updates and most compelling features of the Salesforce Summer ’24 release.
As part of an initiative to adhere to heightened email security standards, organizations using Salesforce must now establish and verify a default No-reply email address.
Implementing a verified Default No-Reply email address organization-wide is crucial for sending emails from your org, ensuring accountability and improving email deliverability
Note: Failure to set up this email address will result in undelivered emails due to the new security standards.
Implementation Steps:
Salesforce is transitioning from Aura to Lightning Web Components (LWC), enhancing the performance of modals within the Lightning Experience.
This update notably improves handling large numbers of fields in record creation or edit modals and introduces compatibility with Dynamic Forms in modals triggered from a ‘Create from Lookup‘ field.
For LWC quick actions using the lightning/navigation module, set replace to true to close the previous modal automatically.
For Aura quick actions previously utilizing force:createRecord or force:editRecord, update your implementation to use lightning:navigation to control post-save navigation explicitly.
This update streamlines modal interactions and supports a more efficient user experience by leveraging the advanced capabilities of LWC.
Key Changes:
Implementation Steps:
As browsers move towards fully blocking third-party cookies, it’s crucial to adapt your Salesforce configurations to ensure the continued functionality of custom integrations and code.
Many Salesforce features, such as Lightning Out and authenticated Visualforce pages on third-party sites, rely on Salesforce session cookies.
Major web browsers are progressively restricting third-party cookies, with significant changes planned, including Google Chrome’s full block scheduled for December 2024.
This setting helps mitigate potential disruptions by ensuring that Salesforce cookies are recognized as first-party, aligning with evolving web standards and enhancing security and compatibility.
To enable a specific ‘My Domain’ setting to test how these changes affect your Salesforce integrations, follow the steps below.
Actions Required:
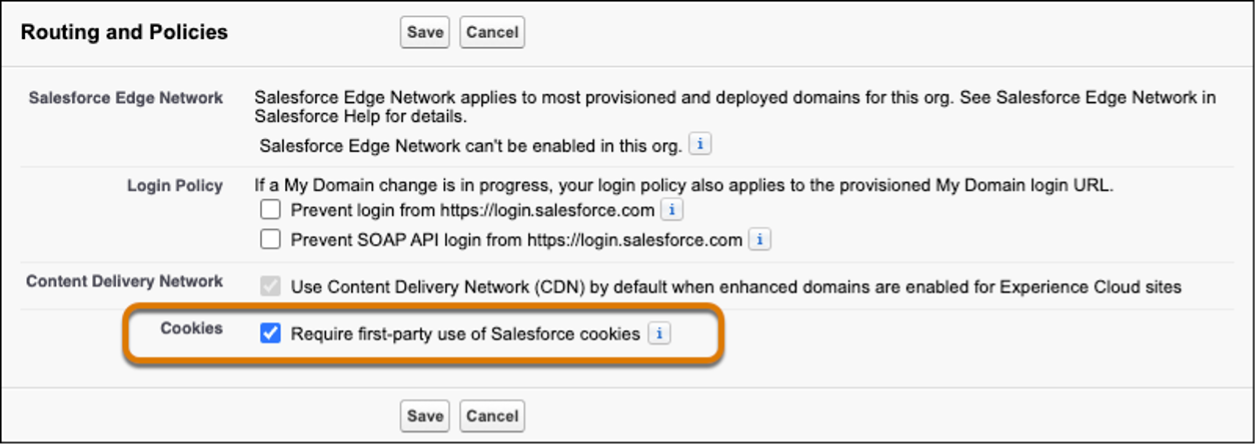
How to Enable the Option ‘Require first-party use of Salesforce cookies’ | Source: Salesforce
Einstein for Formulas now extends its functionality to not only detect syntax errors in Salesforce formulas but also offer corrections.
This tool is useful across various Salesforce components such as Formula fields, default field values, and record validation rules.
Previously, while Salesforce could identify syntax errors, it did not provide solutions. Einstein for Formulas enhances this by suggesting actionable corrections directly in the Formula Editor, streamlining your workflow.
This update significantly improves the efficiency of formula creation and troubleshooting, helping to ensure accuracy and functionality in your Salesforce applications.
How to Use:
Starting the Summer ’24 release, Google Chrome will enforce storage partitioning for Salesforce domains.
A new setting allows companies to disable this feature temporarily, providing additional time to transition from unpartitioned storage until September 2024.
Storage partitioning affects web APIs such as localStorage and sessionStorage, which may require updates to storage solutions that are compliant with the same-origin policy or that facilitate cross-origin access.
Note: After September 3, 2024, Google will enforce storage partitioning universally, regardless of Salesforce settings. Adjustments to third-party storage solutions might be needed, and Salesforce cannot provide direct support for these external changes.
Steps to Opt-Out:
Improve your workflow in Salesforce’s Lightning Experience with upgraded error handling for pages that become out of sync with the Salesforce server.
This update aims to minimize disruptions and provide a more user-friendly approach to handling synchronization issues.
Previously, an outdated page would immediately trigger an error message and force a page refresh.
Now, the server first tries to process the outdated page. If successful, you’ll see a warning message prompting you to refresh the page at your convenience, ensuring you don’t lose any progress unexpectedly.
In cases where the server cannot process the outdated page, an error message will appear, advising you to refresh the page to resynchronize with the server.
We will teach you how to use CRM software to the fullest without overpaying for unnecessary functionality.
Enhance your Dynamic Forms-enabled pages in Salesforce by seamlessly adding new custom fields using an updated step in the custom-field creation wizard.
This update simplifies the process of adding custom fields to specific pages, making it more efficient and reducing the need for manual adjustments.
Note: If there are no Dynamic Forms-enabled pages for the object you are creating the field for, this additional step will not be displayed.
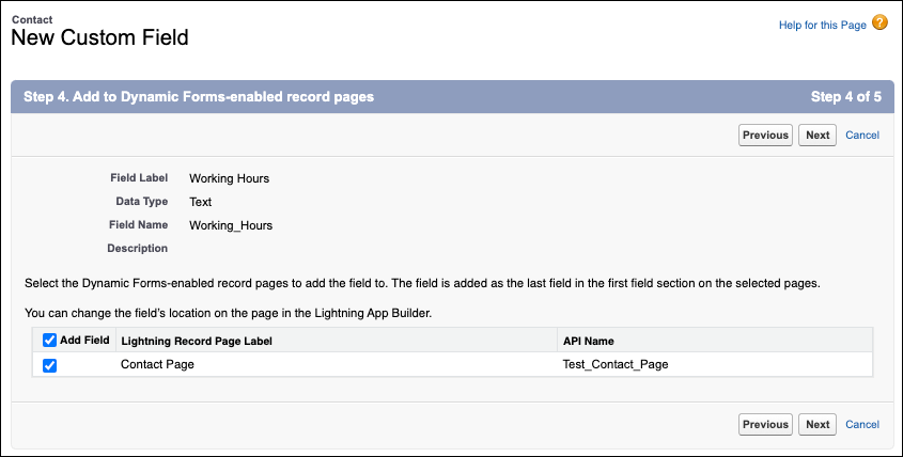
How to Add New Custom Fields to Dynamic Forms-enabled Record Pages | Salesforce
How to Add a Custom Field:
Leverage the improved Apex Connector Framework to develop custom adapters for Salesforce Connect, enabling access to a broader range of external data types.
This enhancement allows users to interact with and search through an enriched set of external data directly within Salesforce.
Key Enhancements:
The framework now supports additional external object field types, enhancing the versatility and functionality of Salesforce Connect.
The newly supported field types include:
Implementation Steps:
This update facilitates deeper integration with external systems, offering users a more comprehensive data interaction experience directly from Salesforce.
Discover the subtle yet significant enhancements that boost accessibility in list views.
Users with keyboards can now navigate through related lists using the Ctrl+Opt+Arrow keys.
Here’s how:
With a new release, users now can apply personal labels to records, enhancing their ability to organize, track, and quickly locate the records they need.
Labels can be tailored to suit various needs such as region, project, campaign, or other organizational categories, ensuring a more efficient workflow.
Personal labels help users categorize records in a way that makes sense for their specific work requirements and easily view all records associated with a specific label and manage the labels you’ve created.
This feature provides a powerful tool for personalizing and accessing important records efficiently, aligning with individual workflow needs.
Applicable Objects for Labeling:
Note: Personal labels are distinct from Topics, which are visible to other users, and do not impact labels used in To Do Lists.
How to Implement:
Access Rights: Users with standard profiles automatically have access to the Label object.
For those with custom profiles, ensure they have the necessary permissions to use both To Do List labels and record labels by granting access to the Label object.
With a new SF Summer ’24 Release, you can now effectively track how custom fields are utilized on Dynamic Forms-enabled Lightning pages.
This is accessible through the ‘Where is this used?’ button.
In this section, any link associated with a “FlexipageFieldInstance” reference type now accurately directs you to the relevant Lightning page details.
Previously, clicking on such a link would lead to an error.
How to Access:
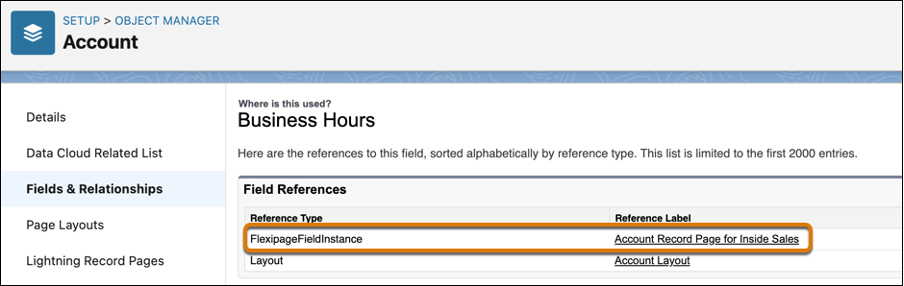
How to Effectively Track How Custom Fields are Utilized on Dynamic Forms-enabled Lightning Pages | Salesforce
Efficiently view a user’s assigned permissions, public groups, and queues directly from the User Access Summary on the user’s detail page.
This feature simplifies access management and troubleshooting by eliminating the need for manual queries or navigating through profiles, permission sets, groups, or queues.
This tool is easily accessible:
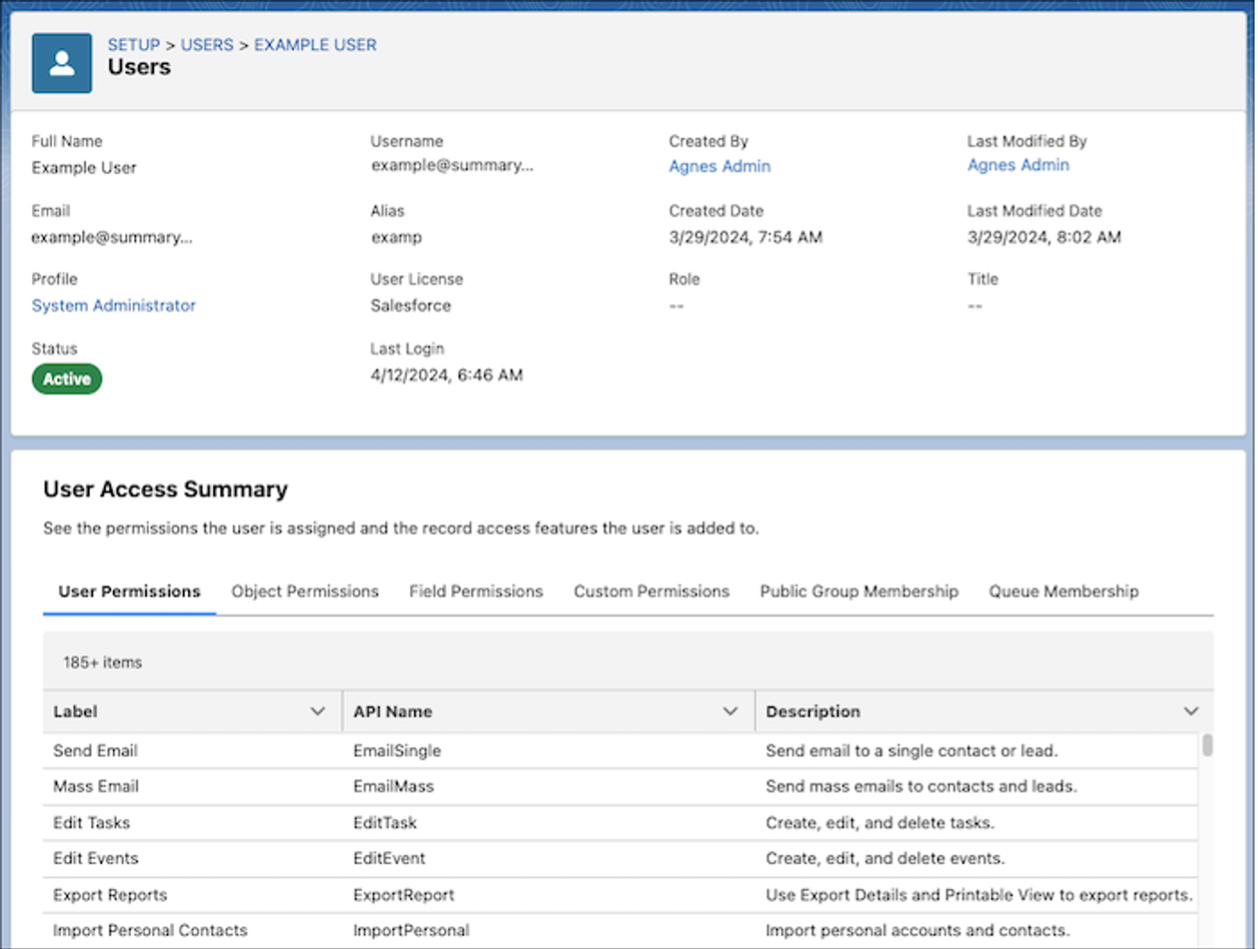
How to View User Access Summary | Ascendix
Effortlessly track the usage and access levels of a public group with the new “Public Group Access Summary”.
Without the need for queries or navigating multiple features, you can view the sharing rules, list views, report folders, and dashboard folders associated with a specific public group.
Additionally, see which other public groups include it.
To access this tool:

Where to View Public Group Access Summary | Salesforce
Enhance efficiency with User Access Policies, now generally available, allowing you to automate the assignment of permission sets, package licenses, public groups, and other access features based on predefined criteria.
These policies can automatically grant or revoke access when users are created or updated, or facilitate the migration of large user groups to new access settings in a single operation.
Recent updates since the Spring ’24 release include the ability to create up to 200 active policies, a significant increase from 20, and manage the execution order of these policies.
To enable and manage User Access Policies:
Enhance control over user access by specifying the execution sequence of active user access policies using the new Order field.
This feature ensures that when a user qualifies for multiple policies, the policy with the lowest order value is applied first.
Policies active before the Summer ’24 release were assigned order values based on their last update; however, adjusting these values to better suit your needs is advisable.
Policies not set to automate do not have order values.
To modify an order value:
Streamline your user management by granting specific permissions for freezing/unfreezing users and monitoring login history, without needing the broader Manage Users permission.
Utilize the ‘Freeze Users‘ permission to allow designated staff to manage user access, and the ‘Monitor Login History‘ permission for accessing and downloading user login details.
These permissions provide focused access to essential functions previously under the more comprehensive Manage Users role.
For users already with Manage Users permissions, these new permissions are enabled by default.
To assign these permissions, simply add them to a permission set and allocate it to the required users.
Discover more about all the upcoming changes in the Permission & Sharing category here.
We offer all types of Salesforce consulting services such as implementation, integration, customization, administration, AppExchange app development.
Enhance the layout of your Dynamic Forms on Salesforce Lightning pages with the new Blank Space component. This feature allows for more precise field alignment within sections, offering a cleaner and more organized visual presentation.
This update provides greater flexibility and control over the appearance of your forms, ensuring that they meet both functional and aesthetic needs efficiently.
Functionality:
Example:
How to apply the Blank Space in Lightning App Builder:
Note: Each Blank Space component counts as a field toward the limit of 100 fields per section but does not affect the overall component page limit.
Tailor the user experience in Salesforce by dynamically configuring the visibility of individual tabs within the Tabs component in the Lightning App Builder.
This update offers a practical solution for administrators and developers looking to enhance navigation and efficiency in their Salesforce environments.
This feature is available for LWC-enabled record pages, allowing you to show or hide tabs based on specific conditions.
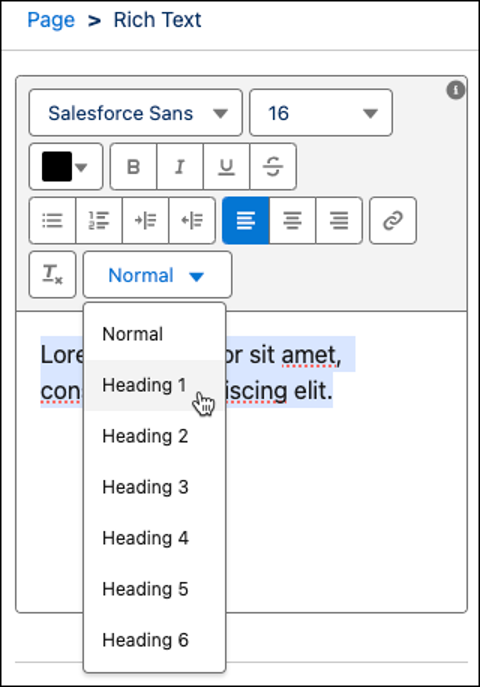
Elevate the appearance of your Lightning pages with the ability to style rich text using heading levels like Heading 1 and Heading 2.
This feature, accessible through a new dropdown menu in the ‘Rich Text’ component editor, not only enhances visual hierarchy but also improves accessibility for screen reader users.
Steps to Customize Rich Text Headings:
How to Customize Rich Text Headings | Salesforce
The Lightning App Builder now supports the Compact density setting in previews for Dynamic Forms-enabled pages.
This feature adjustment allows you to view fields with reduced vertical spacing, aligning with the Compact mode settings.
This update streamlines the page configuration process, ensuring that administrators can effectively manage and preview layout adjustments in real-time.
When Compact mode is activated, the field sections within the Lightning Record Page will display with shorter heights, offering a more condensed view.
Explore other important updates in Lightning App Builder in Summer’ 24 here
Salesforce is enhancing the base Lightning components to support the native shadow DOM, aiming to improve performance and adhere to Web Components standards.
This involves updates that alter the internal DOM structure of these components.
These preparations are part of our commitment to enhancing component functionality and supporting evolving developer needs.
Components Updated for Summer ’24 Release:
Starting with LWC API version 61.0, component lifecycle hooks utilize only native browser APIs, aligning with modern browser standards.
This update addresses issues like inconsistent disconnectedCallback() executions that could lead to memory leaks. The change primarily affects testing code, so revising your tests is advisable.
Key Changes:
Look for more Salesforce Summer ‘ 24 Release updates in this category here
Apex continues to evolve, offering a host of new and updated features across various namespaces:
Auth Namespace Enhancements
New Classes and Utilities:
Updated Methods:
Auth.JWT Class:
ConnectApi Namespace
New Features: Introduction of classes, methods, and enums expanding functionalities for REST API resource actions.
DataSource Namespace
Updates:
System Namespace
Additions:
Enhancements:
Developer Tools:
This update provides extensive tools and functionalities, reinforcing Apex’s capabilities and user flexibility.
You may also review the full list of SOQL error and functionality updates
Improve the management of Apex scheduled jobs and prevent potential limit issues by monitoring the utilization rate of your scheduled jobs.
This feature enhancement allows for scheduling Apex jobs directly from the “All Scheduled Jobs” page and provides management options for jobs scheduled via cron expressions.
Additionally, you can now view the ID of the CronTrigger object associated with each scheduled job in the details list.
How to Access:
ApexTestResult rows are now automatically generated for Apex tests that use the @testSetup annotation. To differentiate these from other test methods, a new IsTestSetup column is marked as true for these tests.
Additionally, the TestSetupTime column in ApexTestRunResult now captures the total setup time for all methods in a given test run, akin to how TestTime aggregates the time for all test methods.
Previously, gathering details about limits and cumulative run times required parsing specific sections of the debug log.
How to Opt-Out of Automatic Updates for Setup Methods:
If you prefer not to automatically generate ApexTestResult rows for setup methods, you can disable this feature using one of the following methods:
Via Setup Interface:
Using the Metadata API:
Check more Salesforce Release updates in Apex
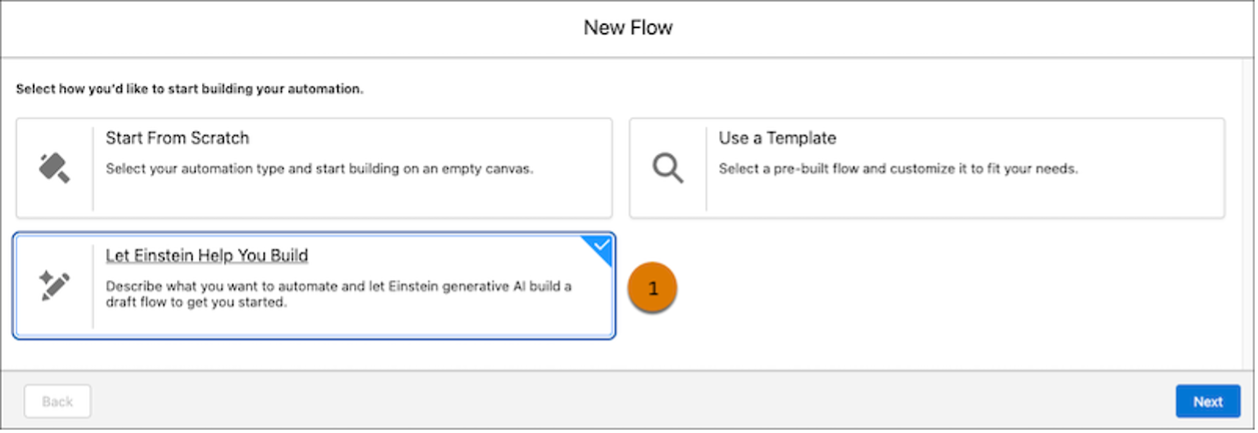
Achieve your automation objectives more easily with Einstein generative AI.
Simply describe the process you want to automate, and let Einstein create a draft flow equipped with the necessary elements and resources to jumpstart your setup.
Available across all Einstein 1 Editions including Enterprise, Performance, Unlimited, and those bundled with Einstein for Sales, Einstein for Service, or Einstein for Platform add-ons.
How to Create a Draft Flow | Salesforce
How to Create a Draft Flow:
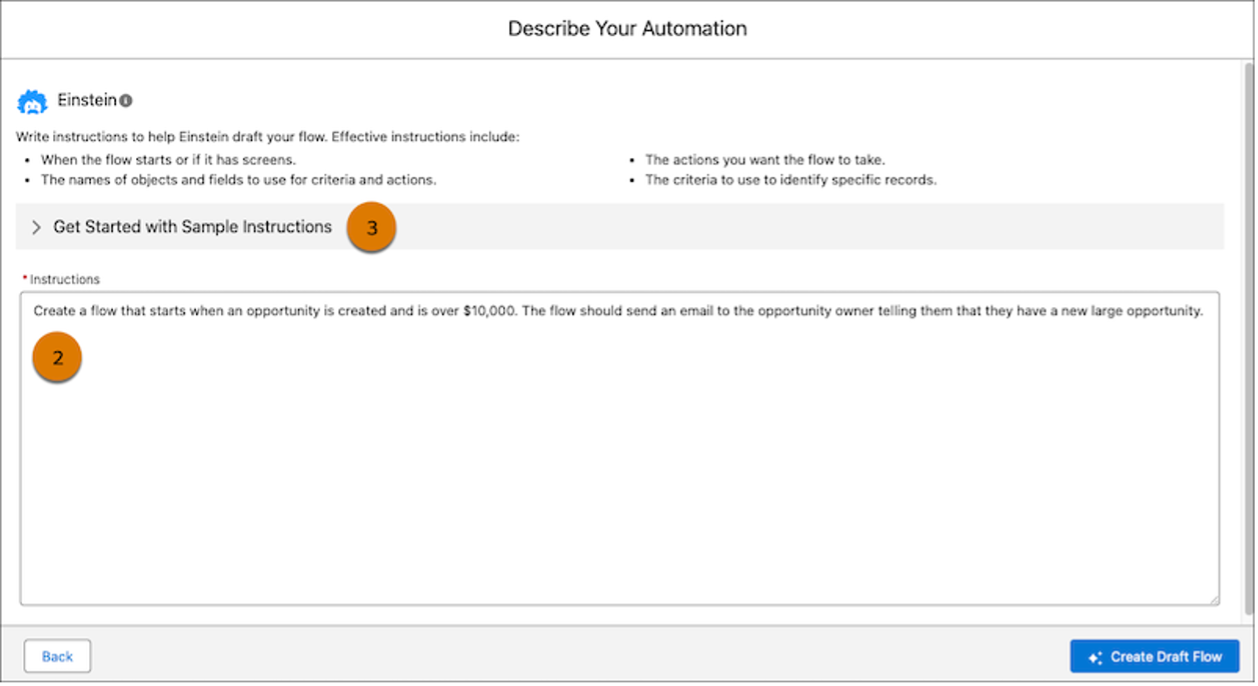
Describe Your Salesforce Flow | Salesforce
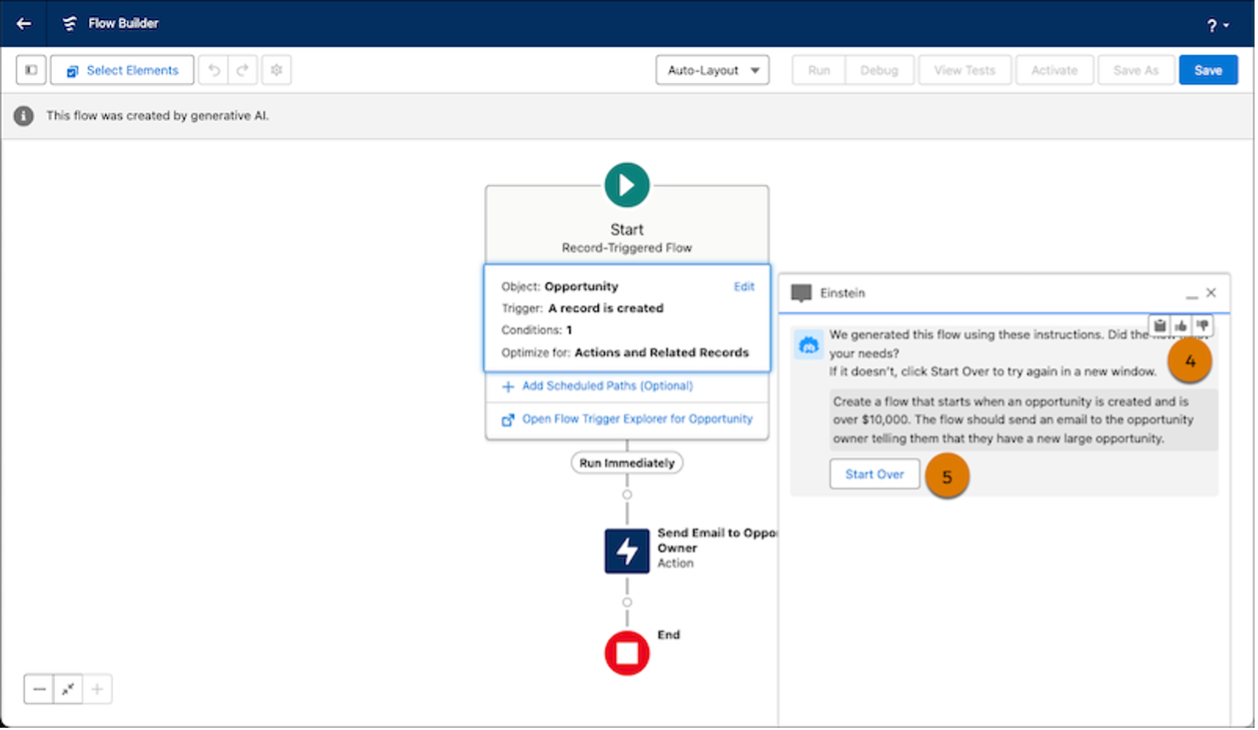
How AI-Powered Salesforce Flow Looks Like | Salesforce
If the flow doesn’t meet your needs, feel free to start afresh in a new window.
This streamlined process not only simplifies the initial stages of flow creation but also ensures that the flows you develop are tailored to your specific needs and are of high quality.
Review more updates for Salesforce Flows here
To enhance security across your network, it’s crucial to allow redirections only to Salesforce orgs that are deemed trustworthy.
To facilitate this, including the URLs of trusted Salesforce orgs in the “Trusted URLs for Redirects” allowlist.
Redirections to URLs not on this list will be blocked, preventing users from accessing content from other Salesforce orgs, including public pages and other content.
This security measure is designed to shield users from potential threats by allowing navigation to another Salesforce org only through trusted and verified links.
This is particularly relevant for redirections such as:
This update will specifically block redirections to external Salesforce orgs unless the destination URL is listed as trusted.
For example, links to an Experience Cloud site hosted on a different Salesforce org will be permanently restricted once this policy is enforced.
Note that this change does not impact the accessibility of URLs within the same org but with different domains, such as navigating from a Lightning page to a file.
Users will continue to have access to all internal URLs within the org they are logged into.
With the latest update, the EmailSimple invocable action now adheres to the email address profile settings established at the organizational level.
This change ensures that any use of the EmailSimple action complies with the existing organization-wide email address profile settings, which were previously overlooked.
Moving forward, any functionalities that employ the EmailSimple action for sending emails will be influenced by these settings.
Specifically, if the action is triggered within a user’s context whose profile settings do not align with those specified organization-wide, the action will respect the restrictive settings in place.
This enhancement secures consistency across your organization’s email communications by enforcing adherence to defined profile settings.
We’ve delved into the key enhancements of the Salesforce Summer 24 release, designed to improve the experiences of users, administrators, and developers by increasing flexibility and efficiency.
If you need assistance with:
Book a free consulting call with us. Let’s work together to find the best solutions for your needs.
Anzhelika is a seasoned B2B content marketing strategist with extensive experience in elevating corporate profiles through compelling content. At Ascendix, she offers a wealth of knowledge in Salesforce consulting, providing valuable tips, tricks, and comprehensive guides. Additionally, Anzhelika stays at the forefront of the industry, delivering expert analysis on the latest Salesforce tools and emerging technology trends.
 (32 votes, average: 4.97 out of 5)