“ You can have data without information, but you cannot have information without data. ”
Salesforce Data Import Tips: An Ultimate Guide on How to Import Data in Salesforce
March 25, 2025
13 min
“ You can have data without information, but you cannot have information without data. ”
We’ve already discussed how to export Salesforce data using different approaches and tools in our previous blog post series. Salesforce data import is a reverse process where you have to validate the quality of your records before they are actually migrated to your CRM system.
Data is an integral part of an everyday business and the effectiveness of its management determines whether the business will be a success or not. Data import and export in Salesforce are the most important activities in its management and we will show how to do it like a pro, regardless of its amount.
In this guide, we’ll break the most important phases of the data import procedure into steps like:
And topped it with a cherry on the cake: our Salesforce data import best practices. So, let’s get it started.
Whether you are importing your data from Outlook, or various sources, it is best to follow some recommended steps to ensure that your data transfer is seamless, accurate, and (virtually) painless. To make this process even more stress-free, our Salesforce consultants can create your personalized data migration plan and Salesforce data import templates that you can modify according to your needs and re-use for future data migration.
Are you just starting with Accounts & Contacts, or do you also want to import Properties and Lease Comps? Gaining an understanding of how much data you will bring over, helps establish an expectation of the magnitude of effort involved. Some people like to start with the basics, others want to see all of their information for it to tie together nicely.
Perhaps one of the most subjective exercises you will encounter. Study your data and determine what really needs to be transferred over, and what does not serve you any purpose. This process also includes aggregating all of your data onto one master spreadsheet (see more on data import templates below).
This is where most of the heavy lifting takes place. Chances are your data exists in multiple places and the fields are called different things depending on where that data came from. For the import process to be correct, there needs to be an efficient way to ensure the data you have in spreadsheets, has a corresponding place in Salesforce.
The best way to ensure that is to use Ascendix’s Data Import Templates. These templates provide you with a guideline on how to move your data over. (Example: your spreadsheet may have a column for the Contact called “Street Address” – but in Salesforce it’s called “Mailing Street Address”) The more “apples-to-apples” the data fields are, the more likely the import process will be quick and simple.
If you have customized fields or columns of data you want to be brought over but you don’t see them in Salesforce, you don’t need to omit this data if it is meaningful to you. You will need to add these new fields in Salesforce before you begin the import process.
We will teach you how to use CRM software to the fullest without overpaying for unnecessary functionality.
Other formatting tips include removing commas from numerical values and ensuring required fields in Salesforce are not blank on your spreadsheet (Examples: Property names, Contact Last Names, Lease Units). Moreover, you need to make sure if you are connecting records and that the match is exact.
For example, if you are first importing an Account called “AlphaGraphics”, and you want to import a lease, where the Tenant is AlphaGraphics, it must be spelled the same way on the lease import template.
Another important point in data formatting is data deduplication. But you can easily solve it by running a duplicate check in Excel. To do it you need:
1. Highlight the column you want to check for duplicates.
2. Click on the Home tab, select “Conditional Formatting”> Highlight Cell Rules > Duplicate Values > “OK”.
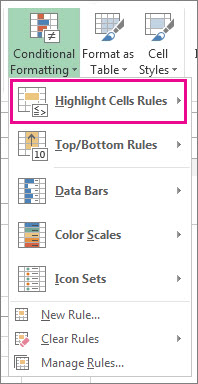
How to Run a Data Duplicate Check in Excel
Now, you’ll be able to see highlighted duplicate values.
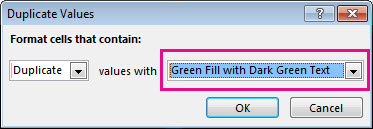
Duplicate Values in Excel
3. If you want them removed, click on the Data tab, and click on Remove Duplicates.
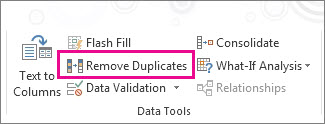
How to Remove Duplicates in Excel
For the most part, the prior steps can be accomplished by you with little guidance from Salesforce consultants. However, once the data formatting process is complete, you may also reach out to CRM consultants to review how the data looks and determine if it’s ready for import.
Besides these hints, you may also read the answers to the most popular Salesforce Import Data FAQs
A Full Guide on How to Create Salesforce Reports
“ The world is one big data problem. ”
To avoid all the mishaps related to data shift and ensure its smooth infusion into the system, we advise dividing this procedure into 5 stages:
Salesforce has 2 main tools for data import:
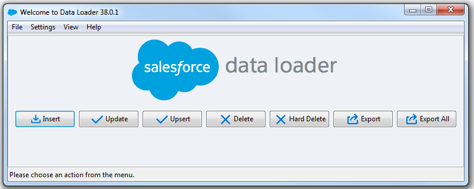
Salesforce Data Loader
*Note. With both tools, the number of records you can load depends on your permissions, the type of data you’re going to import, and the total data storage limits for your Salesforce org. The type of objects you can load depends on your Salesforce edition. Moreover, if you need to import over 5 million records, you should look for ready-to-install mass data loading solutions on AppExchange like Jetterbit, dataloader.io, etc., or custom Salesforce app development services.
Our CRM Consulting Services Journey: Why Did We Decide to Choose Salesforce Our Strategic Partner
No matter what source it is coming from, all data must be divided into separate categories, and data MUST be imported in this order.
*Important Tip: You May Not Realize It, But Your Data May Be Mixed and Matched.
For example, if you have a Property spreadsheet and it has the price for sale and listing date, those are two separate imports. One is for the Property itself (its address, owner or landlord, etc.) Another is for the Listing itself, which discusses the listing price, listing expiration, etc. This is because the property could be listed for sale multiple times, and the transactional element is tracked through the Listing, not the Property. The same applies to a Lease Listing.
Similarly, if you have an Account (or company) spreadsheet, and there is a field called “Lease Expiration Date” – that data belongs on a Lease record, not on an Account record. Why? The Account might have multiple leases, and using a field to de-mark that on the Account does not take into consideration which Property the lease is in, or any of the rich-lease data you may have.
It’s a good practice to review your import file for data accuracy and consistency and to take necessary actions before moving your data into the system.
If you decide to opt for a DIY approach in preparing your data for transferring and to use your own spreadsheet, it’s wise to conduct an audit of the columns in your spreadsheet and the fields already available within Salesforce.
To see a list of Salesforce data fields and types, click on Setup, and in the Quick Find type Objects and Fields, then go to Object Manager, click the object (i.e. Property) whose fields you’re interested in. There will be a section called Fields & Relationships. This will display every field available on the record and the kind of data it supports (number, text, URL, phone, lookup, etc…)
If there are additional fields you want to include in your import, the appropriate Salesforce fields must be added first. (See instructions on how to add fields to a record)
Scrub the data clean – that means remove duplicates, check spelling, enforce naming conventions and make sure no required fields are missing. How do you know if a field is required? Go into Salesforce and take a look at the record in question. If it has a red asterisk, it is required. (And unfortunately, there is no way to un-require it).
*Important Tip: Always save your data as a CSV file to import data from Excel to Salesforce!
Salesforce Mass Email Guide: How to Send Mass Email in Salesforce

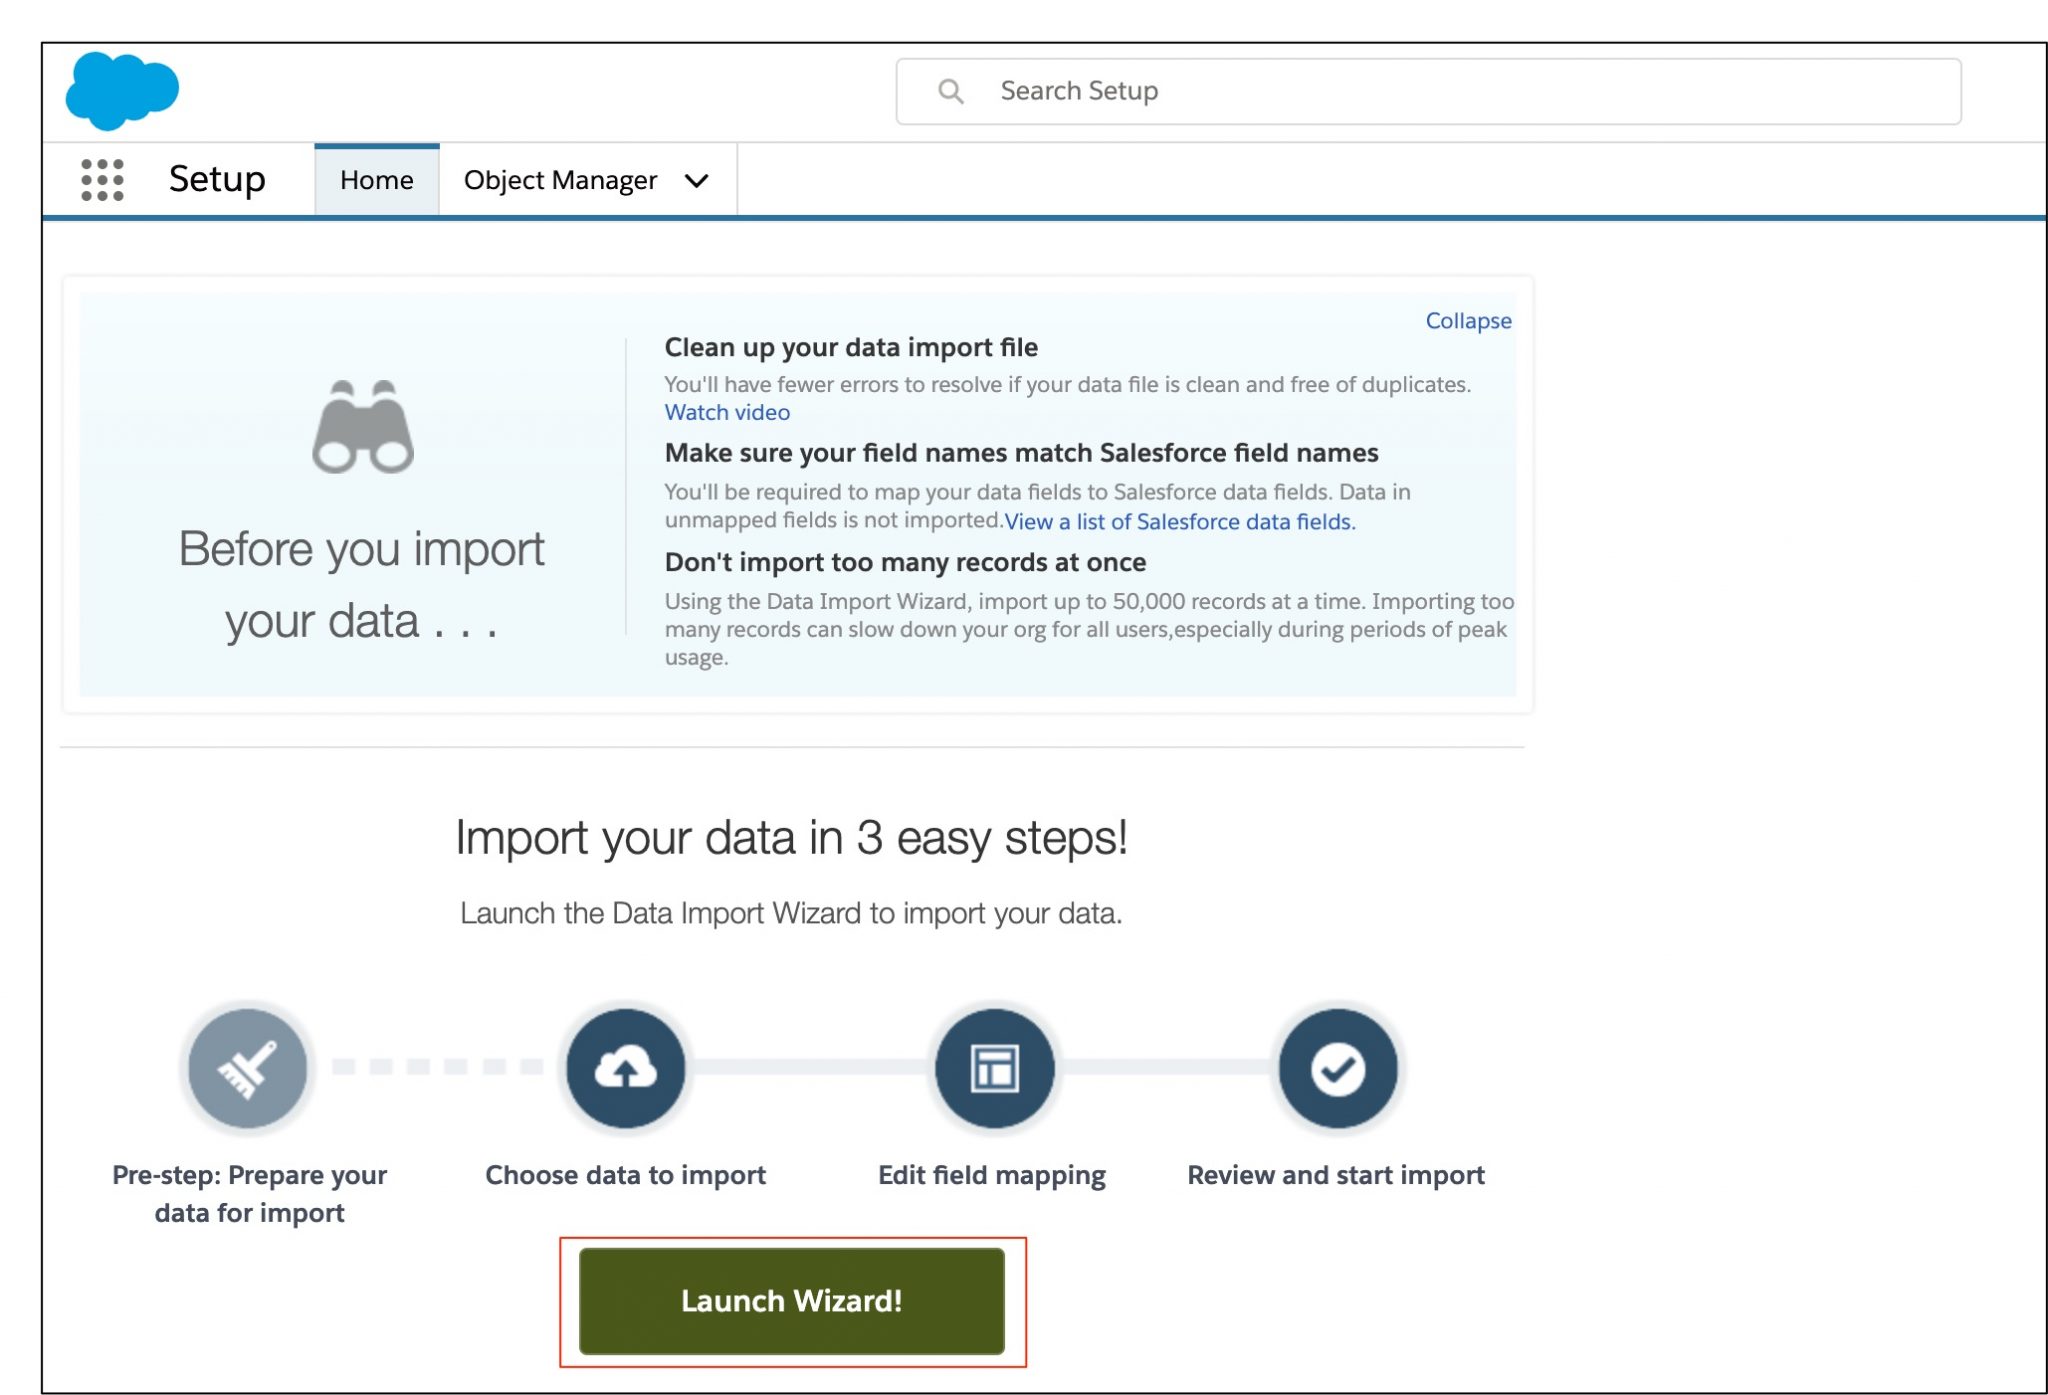
How to find Salesforce Data Import Wizard
2. On the left-hand side, in the Quick Find box, type Data Import Wizard
3. Scroll down and click Launch Wizard!
How to Launch Data Import Wizard in Salesforce
4. Choose the data that you want to import.
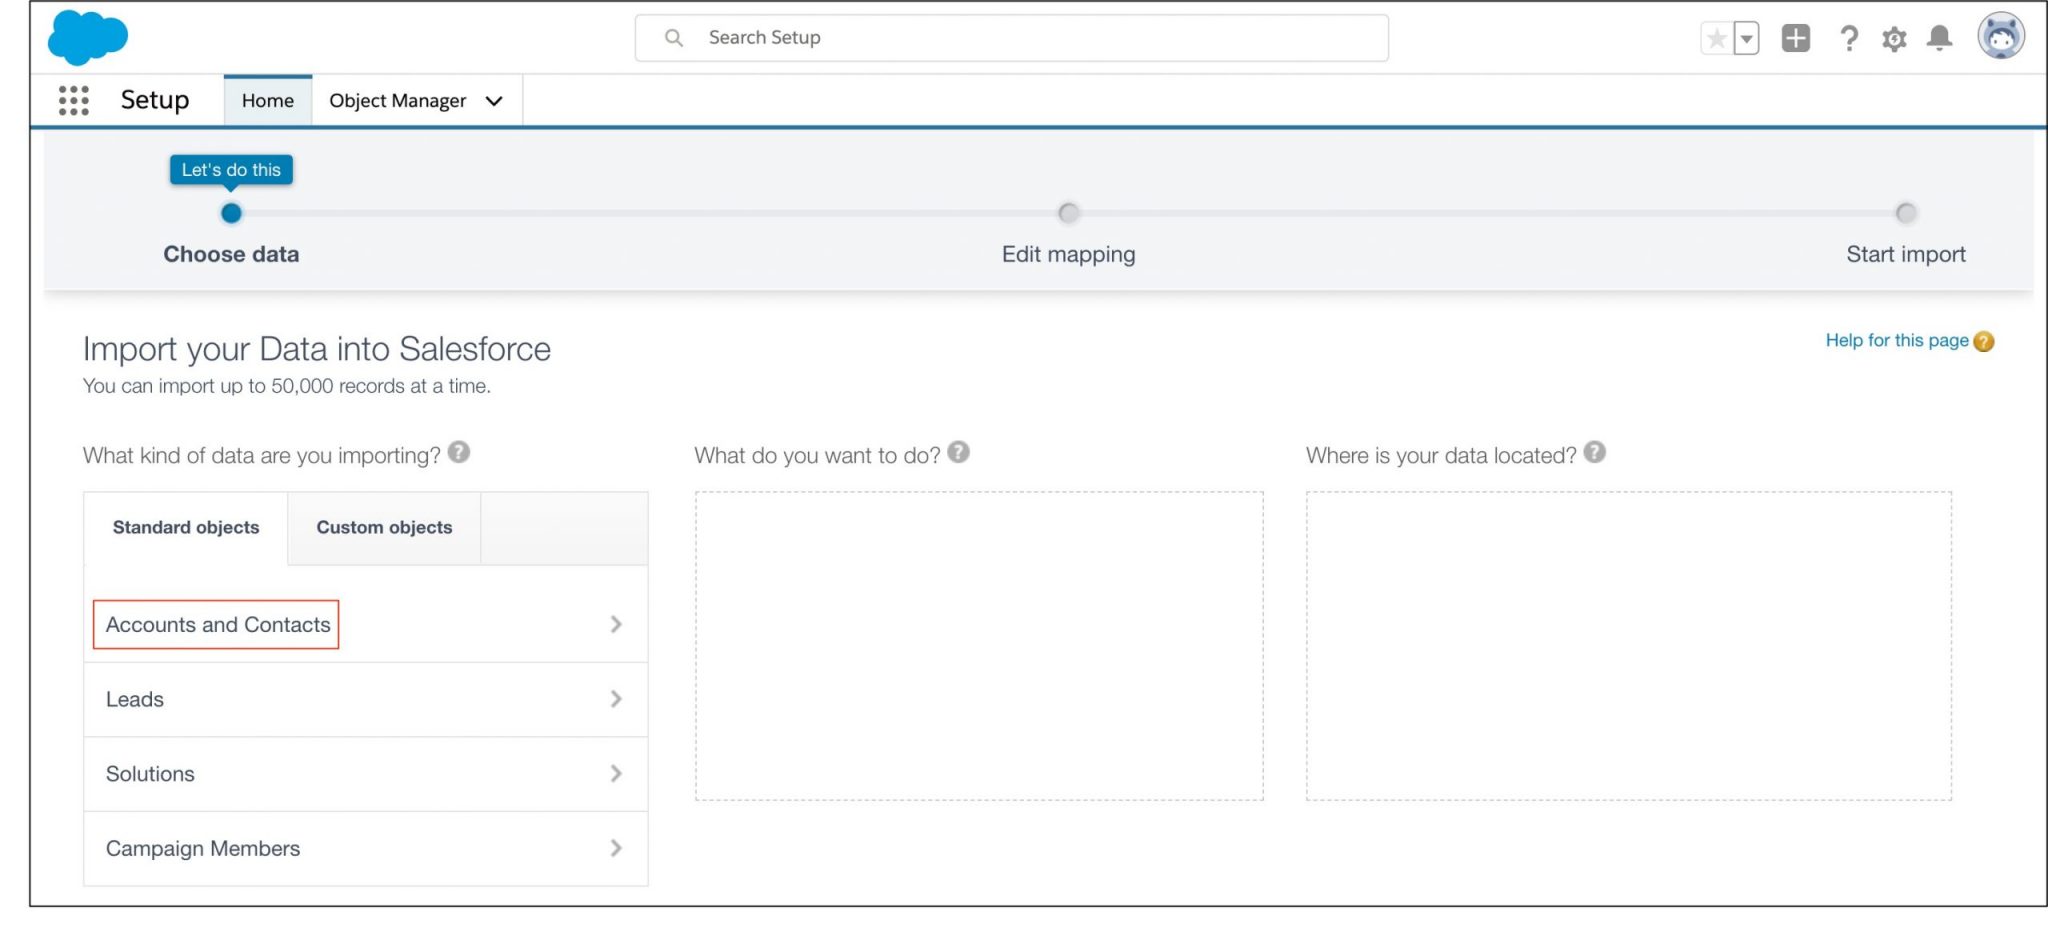
How to Import Standard Objects in Salesforce
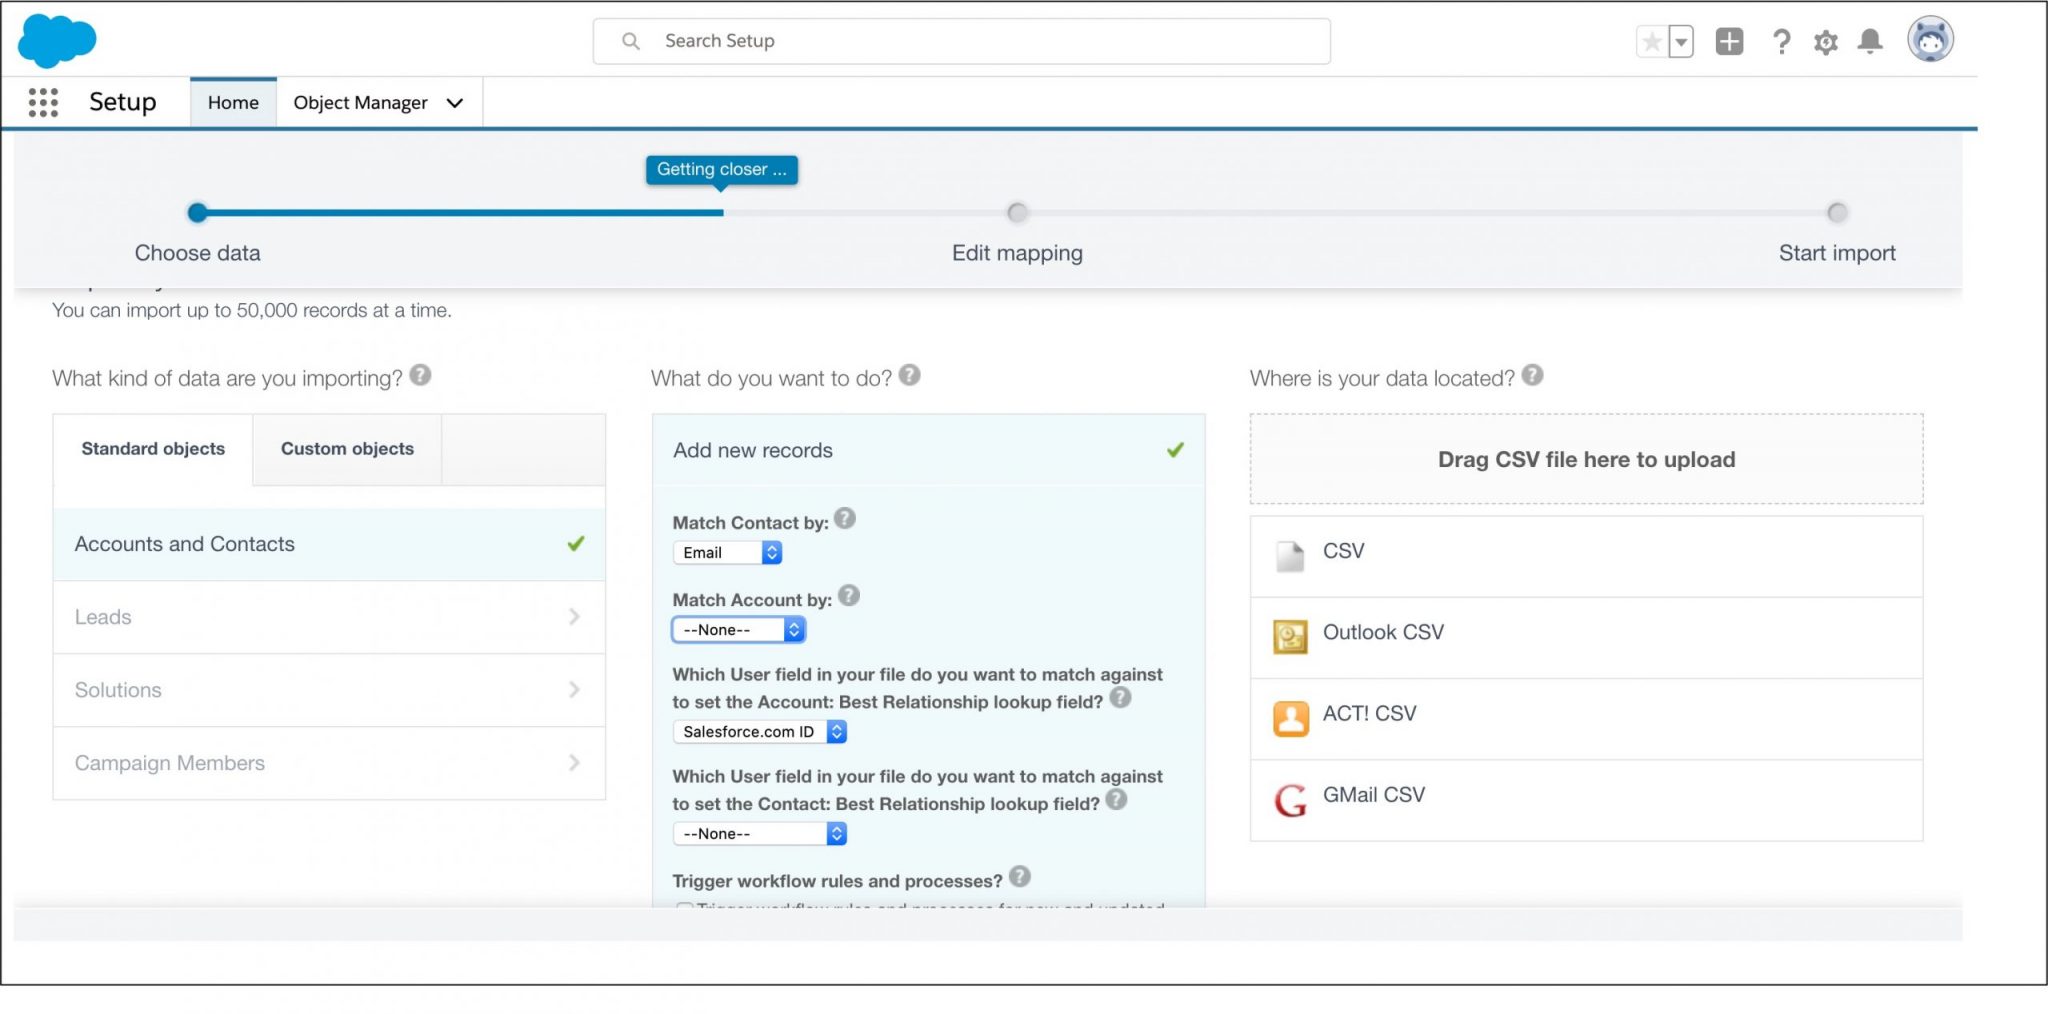
How to Define Matching and Other criteria in Salesforce Data Import Wizard
Here is a screenshot of how you would ensure your Property links the Contacts associated with it:
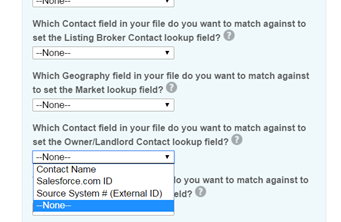
How to Link Property with the Contacts Associated with It
5. Once you’re done tagging relationships, select your CSV file and click Next.
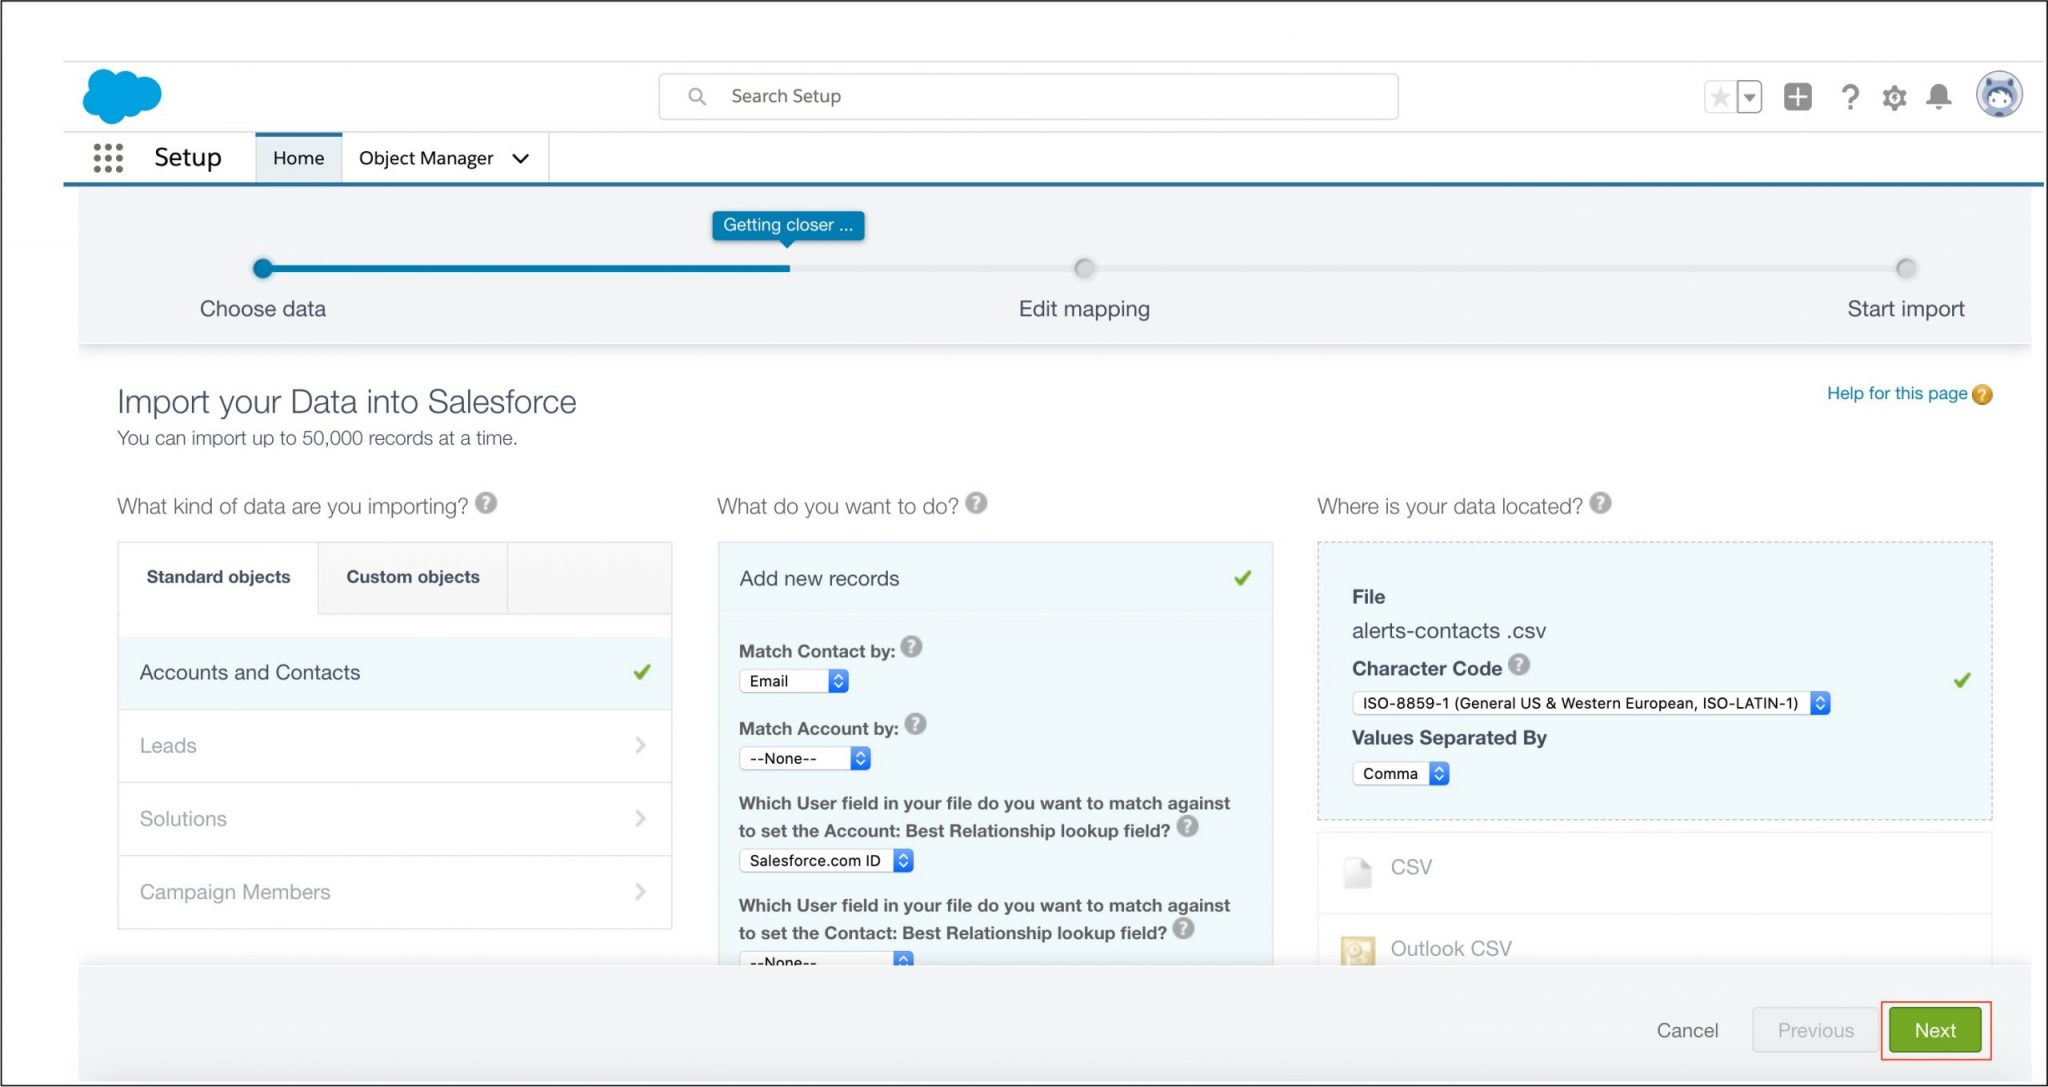
Select the CSV file to upload in Salesforce Data Import Wizard
6. Map your data fields to Salesforce data fields. Mapping, in tech speak, is a way to compare the column headers you have on your spreadsheet, to the fields within Salesforce. In an ideal world, there would be an apples-to-apples interpretation. For example, your spreadsheet for a Contact’s email may say “Email Address”, but in Salesforce the field is called “Email” – you don’t necessarily have to go back and change your spreadsheet, save it, and re-load it.
The Data Import Wizard tries to map as many of your data fields as possible to standard Salesforce data fields. If Salesforce can’t distinguish that Email Address and Email are the same things, you can manually choose it. Any fields you leave as unmapped, however, will not be imported over. Here is what the final step of mapping looks like. According to this, 5 fields were automatically mapped, and 2 were not mapped. Clicking on the highlighted Map link will ask you which field within Salesforce do you want that column to correlate to.
*Disclaimer! The field types need to be the same. If your spreadsheet has a field called “Taxes Per Year” and it’s filled with alphabetical characters such as $30,000 year 1, $45,000 year 2” and you determine Salesforce coincidentally also has a “Taxes Per Year” field – be wary that, the field in Salesforce can only support strictly currency (So, “30000” is the only field it will accept) This goes back to the apples-to-apples concept. It’s not just about field names, it’s about field types.
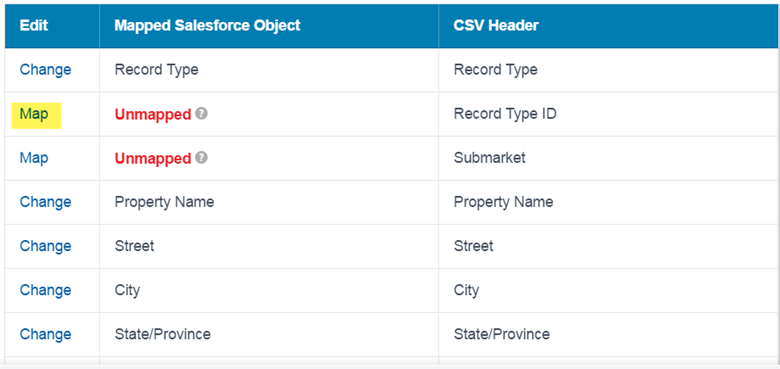
How to Map Data Fields to Salesforce Data Fields in Salesforce
! Some Tips about Salesforce Fields
New Values for Picklists and Multi-Select Picklists — if you transfer a picklist value that doesn’t match an existing picklist value:
Multi-Select Picklists — To load multiple values into a multi-select picklist, split the values by a semicolon in your import file.
Checkboxes — To import data into a checkbox field, apply 1 for checked values and 0 for unchecked values.
Date/Time Fields — Make sure that the format of any date/time fields you are importing corresponds to how they are displayed in Salesforce per your locale setting.
Default Values — For picklist, multi-select picklist, and checkbox fields, if you do not match the field in the Import Wizard, the default value for the field, if any, is automatically entered into the new or updated record.
Formula Fields — Formula fields cannot recognize imported data because they are read-only.
Field Validation Rules — Salesforce applies validation rules to records before they are imported, so if records fail validation, they aren’t transferred. If validation rules affect the data you are importing, deactivate the appropriate validation rules before performing a Salesforce data import process.
Box for Salesforce Integration Overview – Our Exclusive Box Salesforce Integration Approaches
From Setup, enter “Bulk Data Load Jobs” in the Quick Find box, then select Bulk Data Load Jobs
You will be able to see how many of your records were processed (total number of rows on your import spreadsheet), and how many of those failed.
Failures can occur for many reasons, and you will get an email from Salesforce saying what was the reason.

How to Check Data Import Status in Salesforce
Common Reasons for Record Import Failures:
How to Delete Imported Data in Salesforce If You Made a Mistake:
*ascendix__Lease__C” is the API name for the Lease object. Replace this value with the object you were importing (to obtain a list of all API names, go to Objects and Fields >Object Manager and find the API name)
To consolidate all the progress made, you can watch a video series provided by Salesforce on how to import data into Salesforce.
Or complete an Import Data Salesforce Trailhead module.
Salesforce Integration Guide: Essential Considerations to Power Up Your Org
If you don’t want to overcomplicate data management in your organization and delegate all Salesforce-related challenges to professionals that can handle it fast and efficiently, then you are at the right place. We offer our clients various cooperation models where you can be a part of a whole data migration process and perform it under our Salesforce consultants’ guidance or completely hand over its management to our experts.
Our CRM experts will share with your our data import/export/deduplication and other data migration & management tips that we’ve nurtured for over 20 years in the CRM software market, design your custom roadmap, and create your unique guides, templates, checklists, and video tutorials to nail down the success.
Contact us and book your free consultation to find out how our Salesforce experts may help you in maintaining your data and system health.
We are a team of CRM consultants, developers, data analysts from the United States and Europe. Since 1996, we've been helping companies make the most out of CRM software and improve their software systems.
 (47 votes, average: 5.00 out of 5)
You found the right place! We provide a detailed Salesforce CRM assessment for your business purposes and advise on the selected approaches to configuration & customization of your Salesforce solution!